
Small Reach-In Closet Organization: Plan the Doorway, Not Just the Closet
Small reach-in closet organization works best when you plan around the doorway first, not just the total interior width. A reach-in closet can be surprisingly wide inside while still hiding clothes behind side walls, sliding-door overlap, or a narrow opening. That is why an organizer can technically fit and still be awkward to see, open, or pull out.
This guide uses a Retrieval-Window Method: map the visible center, identify blind side pockets, reserve a clear pull-out lane for drawers and bins, and keep door travel clear. The goal is not to fill every inch. It is to make everyday clothing easy to retrieve while lower-frequency items use the harder-to-access zones.
Quick answer: measure the actual doorway opening, put daily clothes in the visible core, reserve blind side pockets for slide-along or occasional storage, place drawers only where they can extend directly through the opening, and use bins only when they can physically pass through the doorway when loaded.
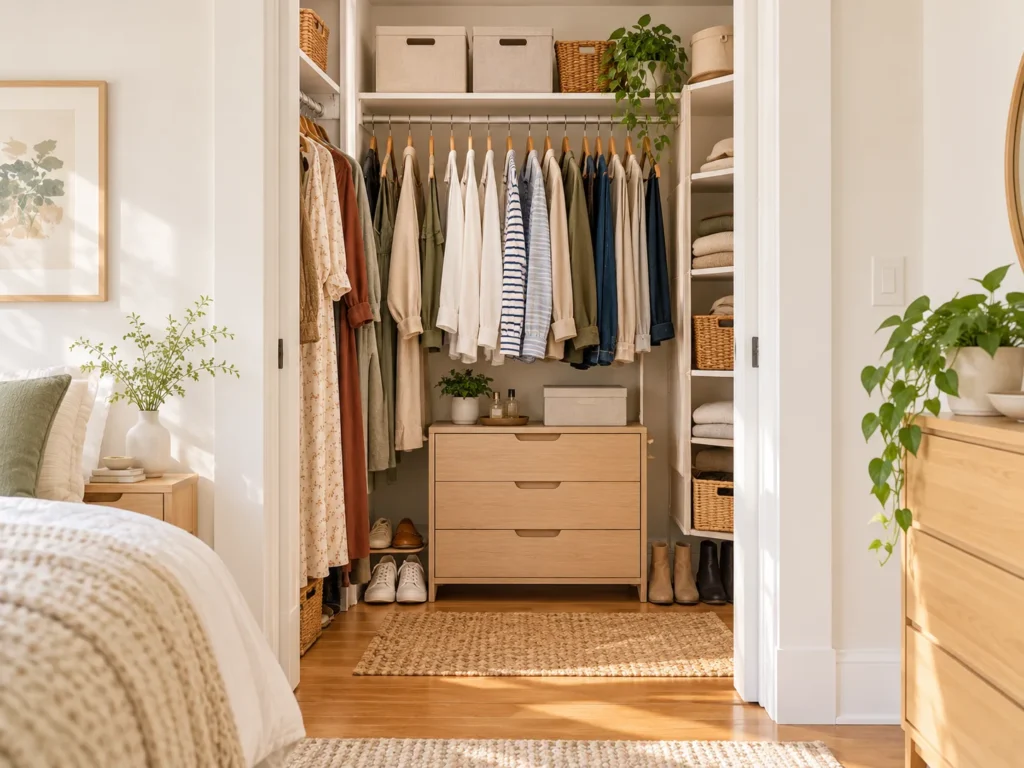
What Makes a Reach-In Closet Different
A reach-in closet is accessed from the room rather than entered like a walk-in. The front wall and door opening can hide part of the interior, which means storage decisions have to account for both space and movement. The closet may have plenty of volume behind the wall returns, but not every part of that volume is equally easy to reach.
The opening can be narrower than the closet
If the interior is 72 inches wide but the opening exposes only 48 inches, you do not have 72 inches of equally accessible storage. The hidden sections can still be useful, but they should not hold items that require a straight pull toward you every day. The opening is the window through which most storage has to work.
Blind side pockets change what is usable
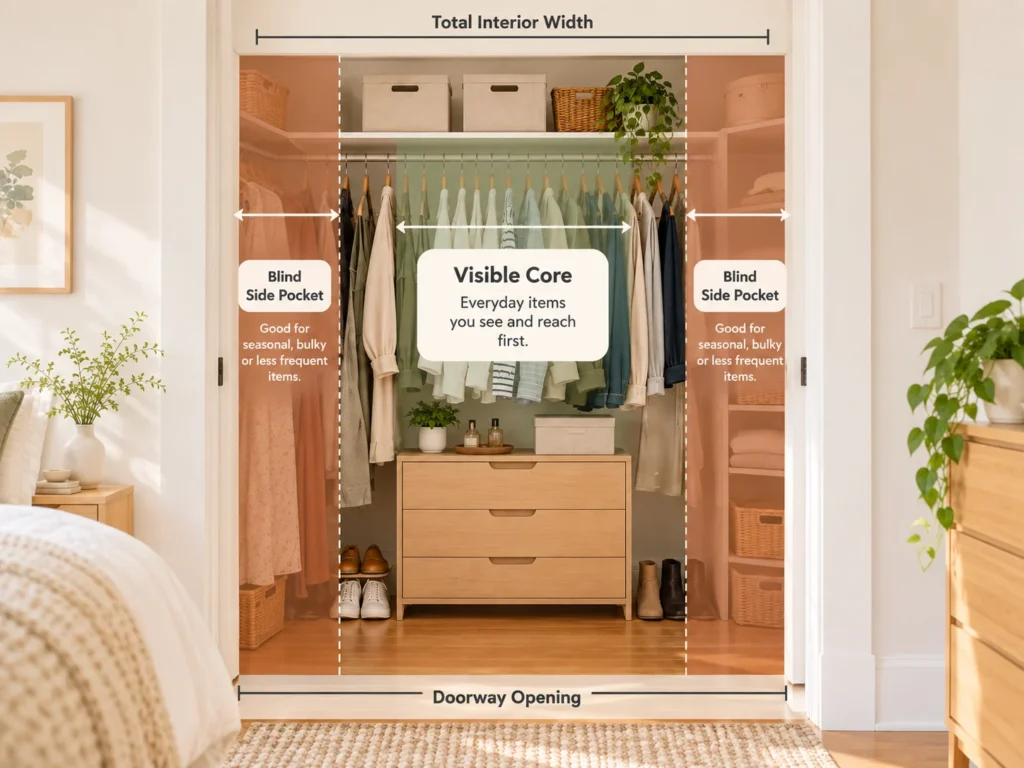
The areas that extend beyond the doorway on the left and right are blind side pockets. Long garments, spare hangers, soft bags, or lower-frequency clothing can work there because they can slide sideways. Wide drawer units and rigid baskets are poor candidates if the wall return blocks their front.
Door type changes access
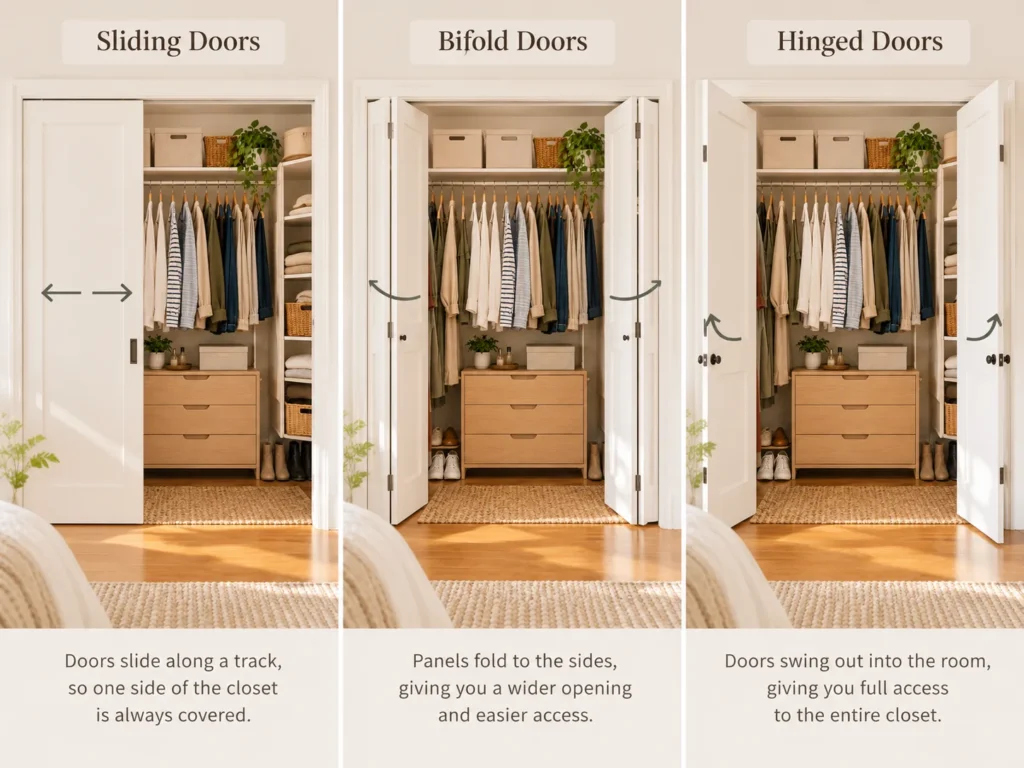
Sliding doors may expose only half the opening at a time. Bifold doors fold into the access area. Hinged doors give a wider clear opening but swing into the room. The same closet dimensions can behave very differently depending on which door is installed.
Capacity is not the same as usability
A layout is successful only if the stored items can be retrieved without unnecessary moves. A closet that holds more but forces you to remove one bin to reach another has increased storage volume while reducing daily convenience. For a broader renter-friendly framework, see our small closet organization ideas for renters.
Measure the Access Geometry Before Buying Organizers
Start with six practical measurements: interior width, interior depth, doorway opening width, left blind-pocket width, right blind-pocket width, and clear pull-out depth into the room. Then note rod height, top-shelf depth, trim, baseboards, hinges, door tracks, and anything else that reduces the clean rectangle you see in a product listing.
The most useful numbers are not simply the closet’s outside dimensions. They describe the path an object has to travel from storage to your hand.
Measure the interior and the actual opening
Measure the finished interior wall to wall and from the back wall to the closed door or front trim. Then measure the narrowest unobstructed opening with the door in its normal usable position. With sliding doors, measure the exposed opening when each panel is moved fully to either side. With bifold doors, include the space taken by the folded panels.
Measure blind pockets and the pull-out path
Measure how far the closet extends beyond the opening on both sides. Then measure the clear space from the closet front into the room. If you are considering drawers, bins, or rolling storage, that outside space matters because the organizer must travel into it. A bed, dresser, bedroom door, or the closet door itself can interrupt the pull-out lane even when the organizer fits inside the closet.
Use the Retrieval-Window Method
Once the measurements are written down, divide the closet into access zones rather than product zones. The Retrieval-Window Method is designed around what you can actually see, reach, and move through the opening. It works whether the closet is narrow, wide, shallow, or partially hidden behind sliding doors.
Visible Core
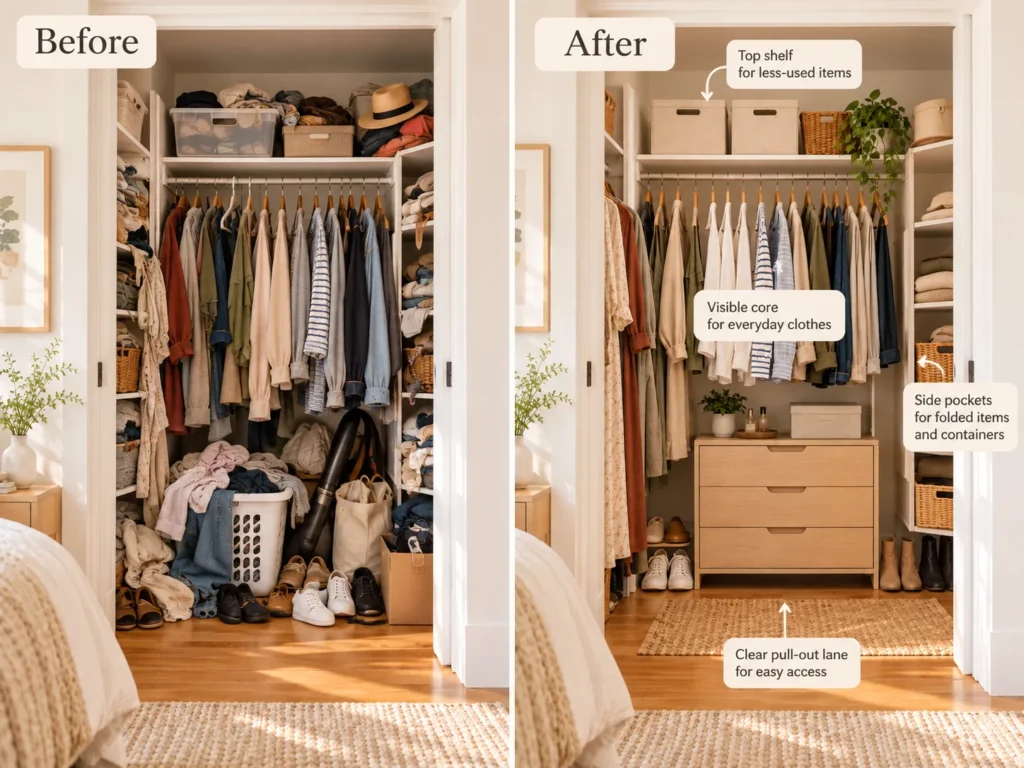
The Visible Core is the area directly exposed by the doorway. Give this zone to everyday shirts, pants, jackets, and accessories. The most frequently used items should not require you to slide another organizer, reach around a return wall, or move a bin first.
Blind Side Pockets
The Blind Side Pockets are the areas hidden beyond the opening. They are useful for items that can slide sideways on a rod or tolerate lower visibility: long garments, occasion wear, spare hangers, soft bags, or seasonal pieces. Avoid placing rigid pull-out furniture where the front face remains behind the wall.
Pull-Out Lane
The Pull-Out Lane is the clear path drawers, baskets, and bins need from the closet into the room. Mark this path with painter’s tape if needed. If the lane crosses a bed corner, door swing, or dresser, choose a different organizer or a different location.
Map the Visible Core for Everyday Clothing
The center of the opening should work hardest because it is the easiest area to see and reach. Instead of arranging the entire rod by color or garment type first, organize the visible core by frequency. The clothing that leaves the closet most often should also be easiest to put back.
Center the items you wear most
Place your regular work clothes, favorite shirts, frequently worn trousers, or daily jackets in the center. Move occasional categories outward toward the side pockets. This reduces the number of small adjustments you make every morning and prevents low-frequency clothing from occupying the best access.
Use one-move retrieval as the standard
Use a simple one-move retrieval test: a daily item should come out without first moving another bin, lifting a basket, or shifting an entire category. If a frequently used item repeatedly takes two or three moves, it belongs closer to the visible core.
Leave room for laundry to return
Leave a small amount of free rod space. Hangers should slide enough that you can see individual pieces, and clean laundry should have somewhere to return. A closet packed to its maximum physical width is usually already beyond its comfortable working capacity.
Use Blind Side Pockets for Slide-Along Storage
Blind side pockets are not wasted space. They are lower-access storage. The best items for these zones are those that can move sideways, compress slightly, or tolerate occasional retrieval.
Good uses for hidden side space
Long dresses, coats, occasion clothing, garment bags, spare hangers, and lightweight seasonal pieces can work well because they can slide along the rod into the hidden area. Keep each blind pocket assigned to one or two clear categories so it does not turn into an unsearchable overflow zone.
Avoid rigid pull-outs behind wall returns
Avoid wide drawer towers, rigid shoe boxes, or deep baskets if their front face sits behind the doorway. If an object has to move directly toward you, align it with the visible opening. Use the hidden sides for slide-along storage rather than straight-pull storage.
Run the Drawer Pull-Out Test
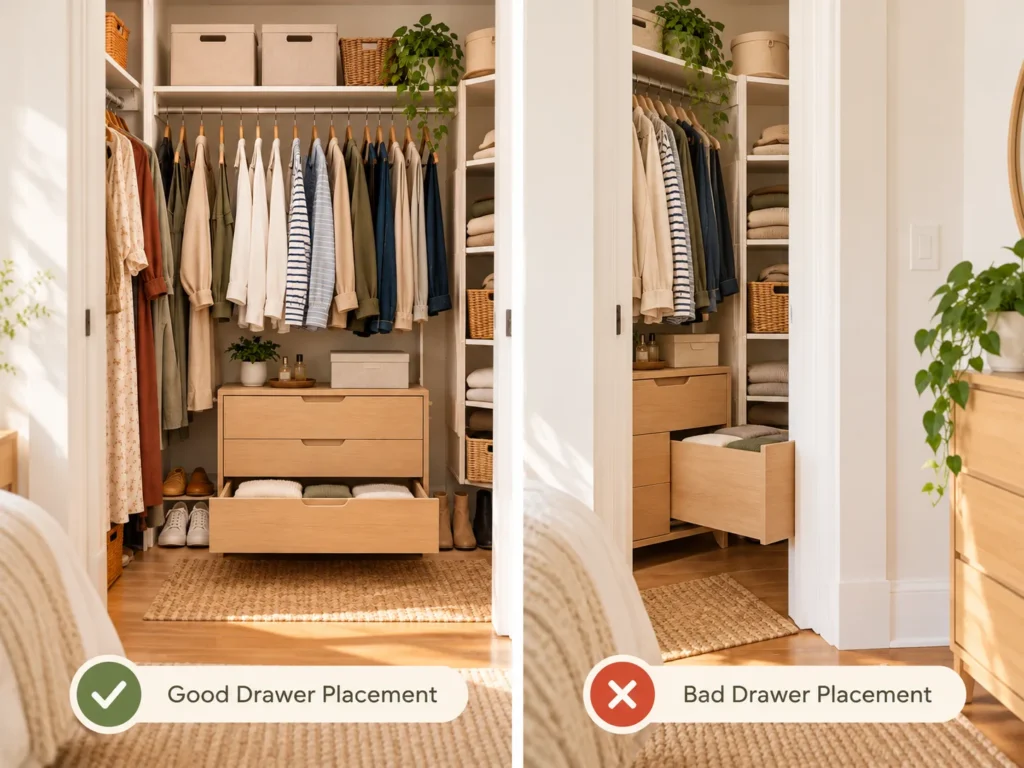
Drawers are one of the most common reach-in closet failures because the cabinet can fit perfectly inside while the drawer itself cannot clear the wall return or door panel. Before buying, sketch the drawer face against the opening and imagine the entire movement path.
Align the drawer face with the opening
The drawer front should face an unobstructed part of the doorway. A unit centered behind a solid return wall may have plenty of floor space around it but still be unusable. If you have sliding doors, verify that one panel can move completely away from the drawer face before deciding on the location.
Check full extension into the room
Measure the unit depth and the drawer’s full extension, then check the room outside the closet. An open drawer should not hit a bed, dresser, bedroom door, or closet door. If the product is a freestanding clothing-storage unit, follow the manufacturer’s anti-tip and anchoring instructions. The U.S. Consumer Product Safety Commission’s clothing-storage-unit guidance explains stability requirements and anti-tip provisions for covered products.
Run the Bin Pass-Through Test
A basket can match the shelf dimensions and still be a poor choice if it cannot pass through the doorway or rotate into a blind side pocket. Compare the rigid outside dimensions of the bin with the narrowest part of the route it must travel.
The bin has to enter the opening
Test the angle, not just the width. A wide basket may need to turn as it enters. If the bin fits only while empty and tilted sideways, it may become impossible to insert once loaded. Shelf lips and door tracks can reduce the turning space further.
The loaded bin has to come back out
Retrieval is equally important. Imagine the container full of folded clothes or accessories. Can you grip it, lift it clear of the shelf, and pull it through the opening without unloading nearby items first? If not, choose a smaller or softer container.
Choose handles for the actual movement
Front handles are useful for bins that pull straight toward you. Side handles may be easier when the container must rotate out of a blind corner. The best handle orientation depends on the movement path, not on which bin looks more decorative.
Plan Storage Around the Door Type
The closet door is part of the storage geometry. Plan with the doors installed and moving normally rather than imagining the opening permanently clear. A solution that works with the doors removed may fail the moment normal hardware is restored.
Sliding doors
Sliding doors usually expose only one portion of the closet at a time. Divide daily clothing between the areas each panel can reveal fully. Put drawers where a panel can slide completely out of the way, and avoid thick organizers attached to the back of sliding panels unless the door system is specifically designed for them.
Bifold doors
Bifold doors stack near the sides of the opening and can interfere with floor units, baskets, or side access. Measure the folded panel stack and keep drawers or shoe racks outside that zone. A few inches of lost opening can make a large difference in a narrow reach-in.
Hinged doors
Hinged doors provide the clearest opening but require room to swing into the bedroom or hallway. They may support compatible lightweight over-door storage. For adhesive hooks or removable mounts, check both the lease and the product’s surface instructions. Command’s official FAQ notes that paint condition, preparation, and correct removal technique can affect whether damage occurs.
Divide Hanging Space by Access
Reach-in closets often benefit from separating long and short garments, but access should decide the placement. Do not add a lower rail across the entire closet simply because there is unused vertical space.
Keep long garments in a side lane
Long dresses, coats, and cardigans can work well in one side pocket because they slide sideways on the rod and do not need a drawer-style pull-out motion. Keep their hems clear of shoe racks or bins so the long-hang lane remains functional.
Use double hanging only where it stays visible
Short garments in the visible core can support a removable lower rail when the vertical drop allows. Both rows should remain directly reachable through the opening. If your reach-in has no built-in shelf at all, our small closet with no shelves hanging-zone plan explains rod budgeting and removable folded-storage options in more detail.
Use the Top Shelf by Access Frequency
A reach-in top shelf often spans both visible and hidden areas. Treat the center and side corners differently rather than lining the full shelf with identical bins. Accessibility changes across the same shelf.
Keep regular-use items near the center
Keep lightweight items you use regularly near the visible center: perhaps a daily bag, folded denim, or one accessory bin. The center is easier to inspect and retrieve without reaching around the front wall.
Use blind shelf corners for low-frequency categories
Side shelf pockets are better for seasonal or occasional categories. Use one clearly labeled category per container so you do not have to pull out several bins in a difficult-to-see area just to find one item.
Bring deep storage forward
If the shelf is deep, choose containers that can be pulled fully forward. Avoid creating a front row that hides a second loose row behind it. The practical goal is to bring the back of the shelf to you rather than leaning into the closet around the doorway.
Use Floor Storage Without Blocking Retrieval
Floor storage should use the space that remains after drawer movement, door travel, and long-garment clearance are protected. A shoe rack or bin should not sit in the exact path another organizer needs in order to open.
Protect the pull-out lane
Mark the pull-out lane before adding floor storage. Frequently worn shoes can sit in one visible row or on the easiest tier of a rack, while occasion pairs can move to the side. Avoid filling the floor wall to wall because the back becomes difficult to clean and retrieve.
Fit low storage under short garments
Low drawers or shoe racks can fit well beneath shirts and folded-over trousers. Measure from the lowest garment hem to the floor while the rail is loaded. Leave enough clearance that clothes do not rest on the organizer and that drawers can open without catching fabric.
Use the One-Move Retrieval Test
The One-Move Retrieval Test gives each storage zone a simple performance standard. It helps you decide whether an item belongs in the visible core or can move to a lower-access area.
Daily items should take one move
Daily clothing, shoes, and accessories should come out in one move. If you need to lift a bin, slide an organizer, or move another category first, the item is probably too far from the retrieval window. The same rule applies when putting it away.
Lower-frequency items can tolerate extra access
Weekly or occasional items can tolerate a second move, such as sliding hangers aside or pulling one lightweight bin forward. Seasonal items can occupy the hardest-to-reach shelf corners or side pockets because their retrieval frequency is genuinely low.
Three Reach-In Closet Layout Examples
Use these examples as geometry models rather than fixed templates. A third common setup is a full-opening closet with hinged doors: keep the visible core broad, center any drawers where they can extend freely, use one side for long hang, and keep the door swing clear outside the closet.
Narrow opening with deep side pockets
Narrow opening with deep side pockets: keep daily short-hang clothing in the center, long garments in one side pocket, occasional clothing in the other, and drawers only in the exposed middle. Use soft or shallow pull-forward bins on the top shelf rather than rigid boxes that require a wide turning angle.
Sliding-door reach-in
Sliding-door reach-in: treat each exposed half as its own retrieval window. Split daily clothing between both sides. Put drawers only where one panel can slide completely away from the drawer face. Avoid one large central unit if the track permanently blocks part of it.
Avoid the Most Common Reach-In Closet Mistakes
The biggest mistakes happen when the closet is treated like an empty rectangular box rather than a storage area accessed through a smaller opening.
- Planning from the back wall instead of the doorway: a balanced layout can look perfect on paper and still be awkward through the real opening.
- Putting drawers in blind pockets: straight-pull storage belongs where the drawer face is exposed.
- Buying bins by shelf size alone: a bin also has to pass through the doorway and rotate into position.
- Using every inch of floor: leave the pull-out lane clear and preserve enough room to clean or reposition a rack.
- Giving low-frequency clothes the visible center: daily items should receive the easiest access.
- Ignoring door hardware: sliding, bifold, and hinged doors each remove a different part of the usable opening.
The simplest correction is to plan movement before capacity. If an organizer creates one new storage zone but blocks another, the net gain may be zero.
Match the Access Problem to the Storage Type
Choose organizers according to the access problem rather than the product category. Use this table as a starting point, not as a shopping list.
| Access problem | Consider | Verify first |
|---|---|---|
| Narrow visible opening | Centered hanging or slim drawers | Full pull-out path |
| Deep blind side pocket | Long hang or soft seasonal storage | Sideways retrieval |
| Sliding-door overlap | Split daily zones | Panel travel |
| Deep top shelf | Pull-forward bins | Bin pass-through angle |
| Open floor under shirts | Low drawers or shoe rack | Hem and door clearance |
| Accessories disappear | Visible center bin or compatible door storage | Door type and load |
Pre-buy checklist: measure the opening, blind pockets, drawer extension, bin pass-through angle, door travel, and short/long garment drop. Check the lease before drilling or using adhesive mounts, follow manufacturer load and installation instructions, and leave some open rod and floor space for normal laundry return.
Small Space Scout rule: if an organizer fits inside the closet but cannot be opened, pulled out, or passed through the doorway, it does not count as usable storage.
Frequently Asked Questions
How do I organize a small reach-in closet?
Measure the actual opening first, then divide the closet into a visible core, blind side pockets, pull-out lane, and door travel zone. Keep daily clothing in the visible core and place rigid pull-out storage only where it can move directly through the doorway.
What should go in the center of a reach-in closet?
The center should hold the clothing and accessories you use most often because it has the best visibility and easiest straight-line access. Leave enough rod space that hangers can slide and laundry can return.
What belongs in blind side corners?
Use blind side areas for long garments, occasion clothing, spare hangers, soft bags, or lightweight seasonal items that can slide sideways and do not require daily access.
Can drawers work in a reach-in closet?
Yes, but the drawer face must align with the opening and there must be enough clear space outside the closet for full extension. Test both the closet doorway and nearby bedroom furniture.
How do I organize a reach-in closet with sliding doors?
Treat each exposed half as a separate access window. Place daily clothing where each panel can reveal it fully, and locate drawers only where a panel can slide completely out of the way.
Should I use over-the-door storage?
Only when the door type, clearance, and product instructions support it. Hinged doors are usually more practical than sliding or bifold doors for lightweight over-door storage.
How do I make a reach-in closet feel less crowded?
Reduce the number of items that require prime access, keep the visible core simple, leave a small return gap on the rod, and avoid filling blind corners with rigid organizers simply because the volume exists.
Plan the Retrieval Path Before You Add Capacity
The best small reach-in closet organization plan begins at the doorway. Measure what you can actually see, open, and pull through the opening. Then assign everyday clothing to the visible core, slide-along storage to blind side pockets, and rigid drawers or bins only to locations with a clear retrieval path.
If you need a complete renter-friendly closet system, use our small closet organization ideas for renters. If your reach-in has no built-in shelf, use our small closet with no shelves guide to plan rod width and removable storage. You can also browse the growing Closet Organization collection.
Capacity comes after access. A closet that gives you a clear path to the clothes you wear is more useful than one that stores a few extra bins behind a doorway you cannot comfortably reach.