
Under Sink Bathroom Organization
Under-Sink Bathroom Organization: A Pipe-First Plan for Awkward Cabinets
Under sink bathroom organization works best with a pipe-first plan: measure around plumbing, choose storage that fits, and keep the vanity easy to use.

Under sink bathroom organization gets easier when you stop treating the cabinet as one empty rectangle. The P-trap, water lines, shutoff valves, hinges and door swing divide the space into smaller usable zones, and those zones should determine what you buy.
A common mistake is choosing a large organizer from a product photo and hoping the plumbing will fit around it. A better method is to map the pipes first, measure the clear space on each side, preserve access to valves, and then choose storage for the space that remains.
This guide walks you through that pipe-first method step by step. If the rest of your bathroom also needs storage, see our small bathroom storage ideas for renters guide for broader renter-friendly options.
Under Sink Bathroom Organization: Start With Your Pipe Layout
Before measuring organizers, open the cabinet and look at where the plumbing actually sits. Two vanities with the same outside dimensions can have completely different usable space inside because one has a centered P-trap while another pushes most of the plumbing to one side.
Start by identifying the layout that most closely matches your cabinet. You are not looking for perfect symmetry. You are looking for the largest uninterrupted areas where storage can sit without touching or hiding important plumbing.
| Your plumbing layout | Best starting strategy |
|---|---|
| Pipe centered | Use two narrow organizers on the left and right. |
| Pipe mostly left | Use the larger organizer on the clearer right side. |
| Pipe mostly right | Use the larger organizer on the clearer left side. |
| Low P-trap | Choose short bins or low drawers beside the plumbing. |
| Deep cabinet | Prioritize pull-out access so products at the back stay reachable. |
| Many valves or lines | Leave a larger service zone and organize only the clear sides. |
| Very narrow vanity | Use small modular bins instead of one large system. |
Measure These 6 Things Before Buying an Organizer
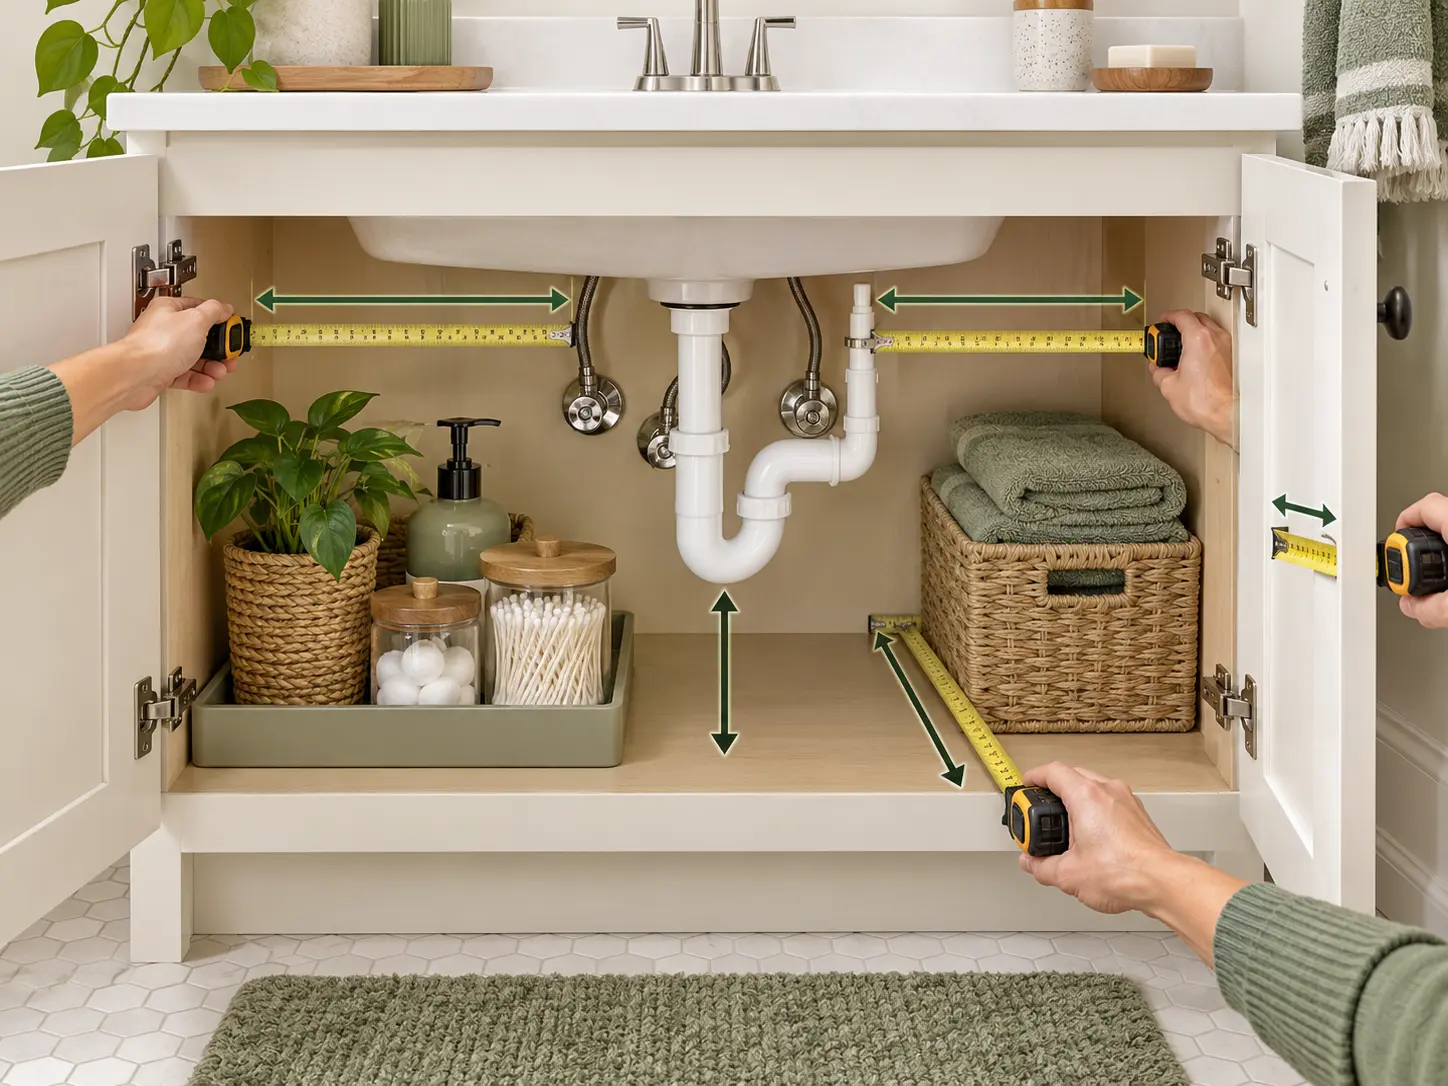
For under sink bathroom organization, do not measure only the cabinet opening. The useful measurements are the clearances around the pipes. Write them down before shopping so you can reject organizers that will never fit.
1. Left-side clear width
Measure from the left cabinet wall to the nearest pipe, valve or obstruction. This tells you how wide an organizer can be on that side.
2. Right-side clear width
Repeat the same measurement on the right. Do not assume the two sides are equal. An off-center drain can create one generous storage zone and one very narrow one.
3. Usable cabinet depth
Measure from the inside front edge to the point where plumbing or the back wall limits storage. A deep cabinet may look spacious but become hard to use if everything disappears at the back.
4. Floor-to-P-trap clearance
Measure from the cabinet floor to the lowest part of the drain assembly. This determines whether a lower shelf, drawer or stacked bin can pass underneath the P-trap.
5. Plumbing-to-door clearance
Check how much room remains between the plumbing and the closed cabinet door. A pull-out organizer can fit on the floor and still fail because its handle, rail or upper tier collides with the door.
6. Hinge and door-swing clearance
Look at where the hinges project into the cabinet and how the doors move. Wide drawers and door-mounted storage can interfere with hinges even when the cabinet seems large enough.
Treat the Plumbing Zone as a No-Storage Zone
The area immediately around the P-trap, pipe joints, supply lines and shutoff valves should stay easy to see and reach. That space is not wasted. It is service space.
An organizer should not force you to unload half the cabinet before you can reach a valve. You should also be able to notice moisture, a loose connection or a slow drip without moving several stacked bins.
Leave enough room to inspect the plumbing and remove the nearest organizer quickly. In a very small vanity, this may mean accepting less total storage. That trade-off is worthwhile because a well-organized cabinet should remain functional when something needs attention.
Choose the Organizer Based on the Plumbing, Not the Product Photo
For under sink bathroom organization, there is no single best organizer. The right choice depends on where the pipes sit, how much vertical clearance you have and whether the main problem is capacity or access.
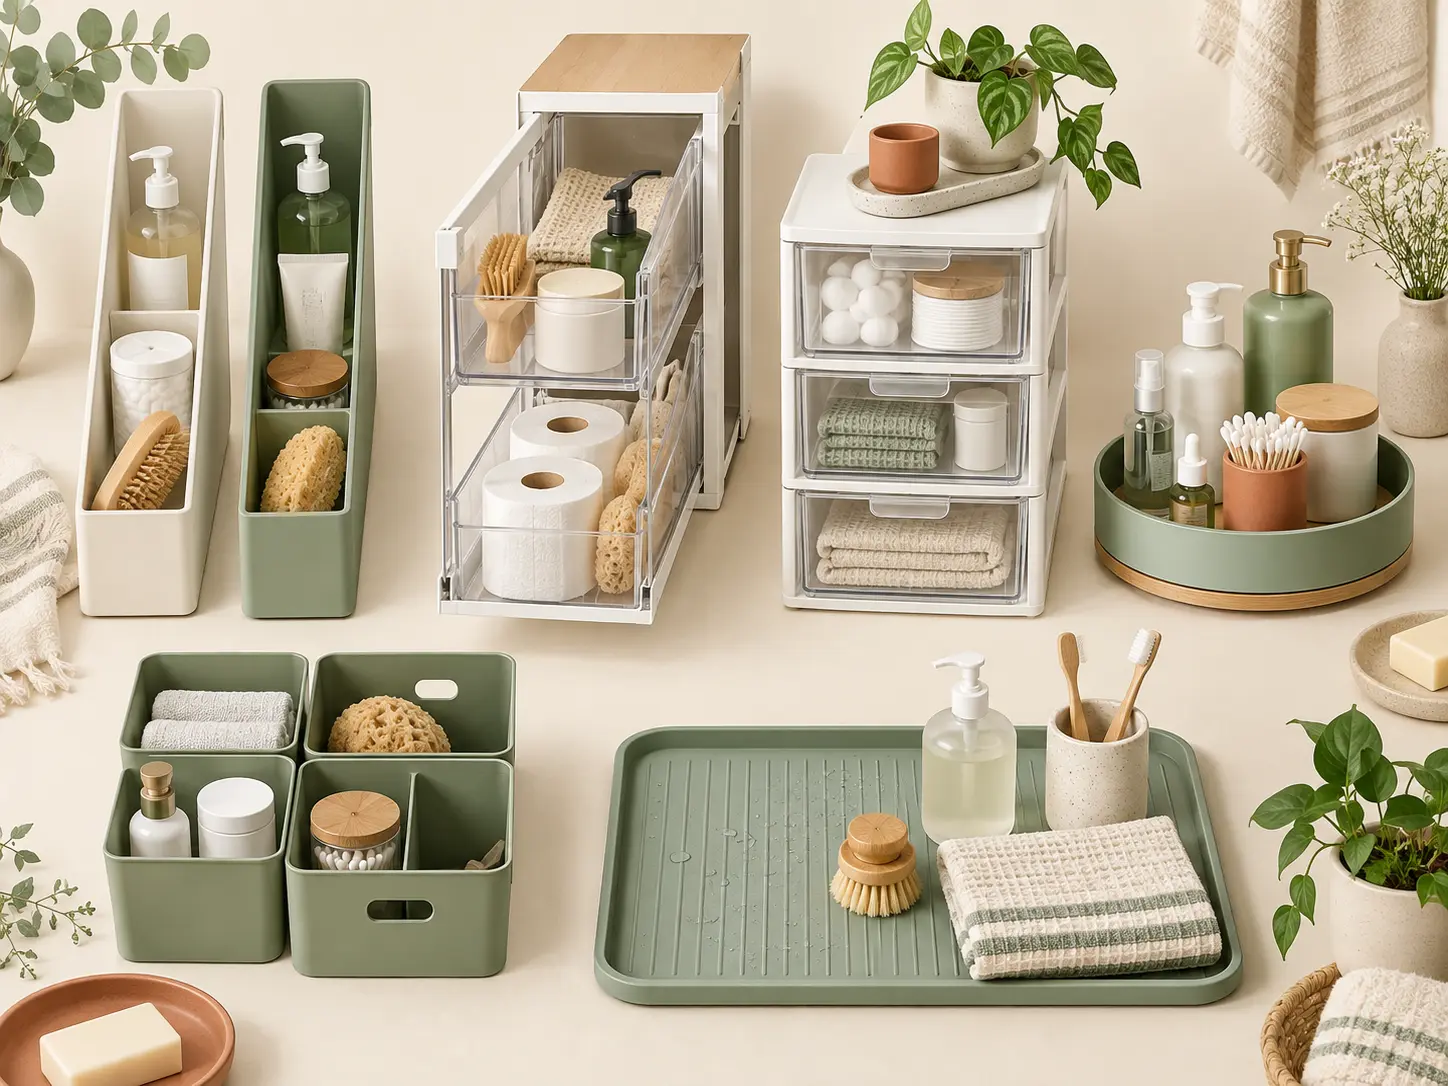
Two narrow organizers for a centered pipe
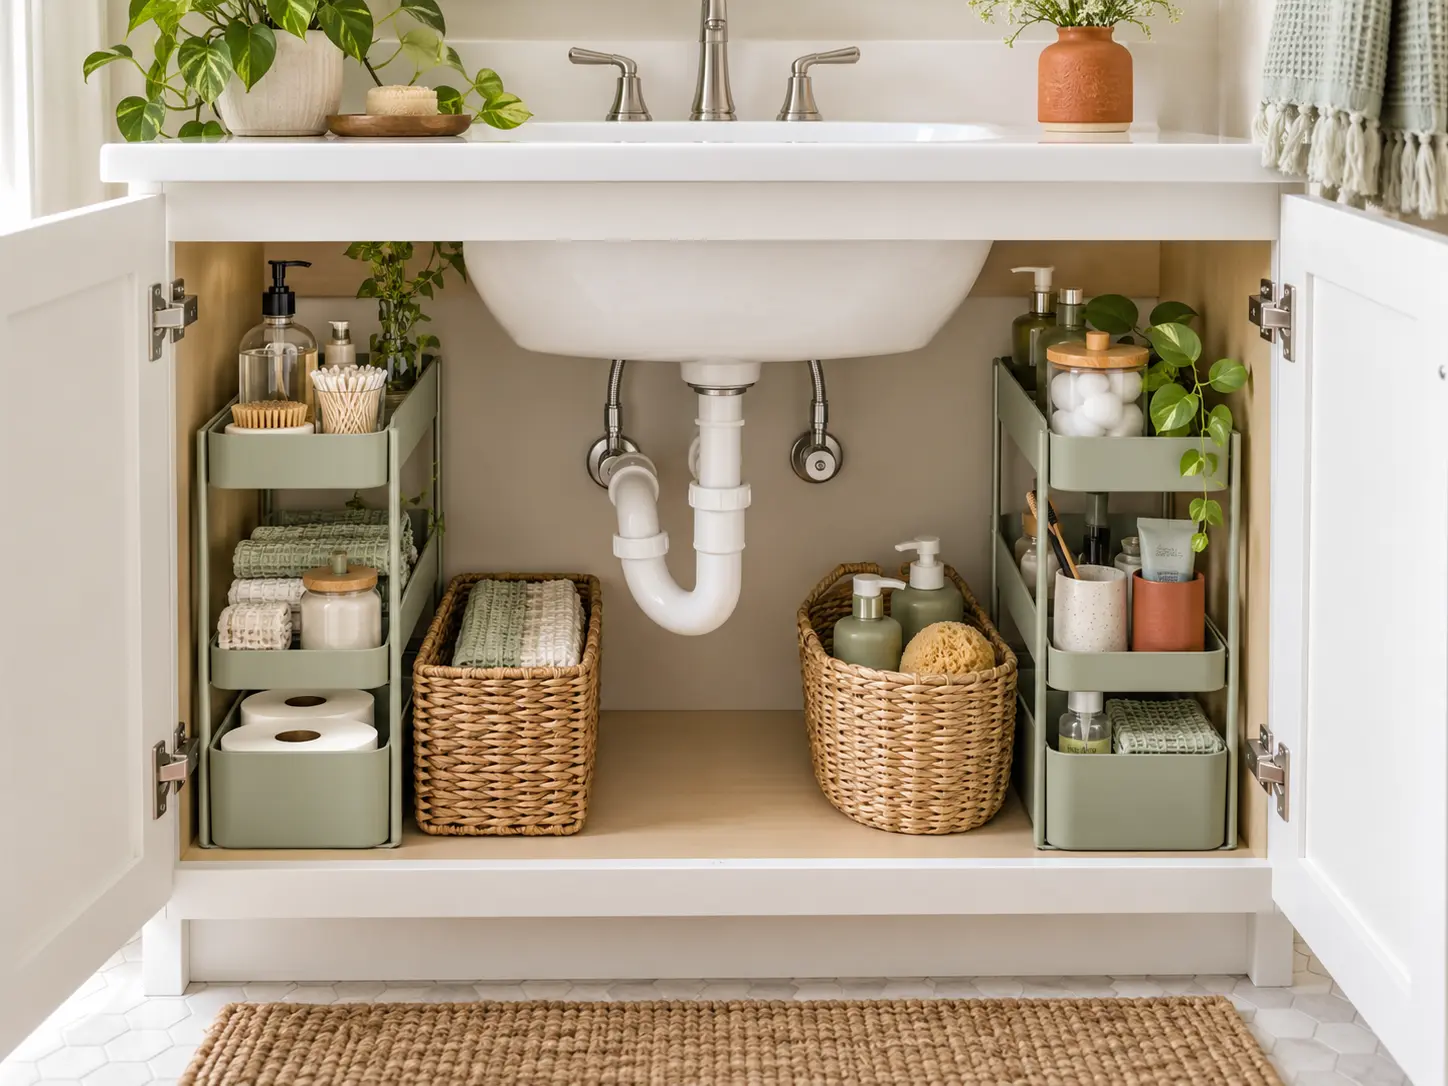
When the drain runs through the middle of the cabinet, two smaller systems usually make more sense than one wide organizer. Place one on each side and leave the center open around the plumbing.
One larger pull-out organizer for an off-center pipe
If most of the plumbing sits to the left or right, use the clearer side for the main storage system. A two-tier pull-out can work well when the drawer can travel without hitting pipes, valves or the door.
Short stackable drawers for low plumbing
A low P-trap limits height more than width. Short clear drawers or low bins beside the pipe can use the floor area without colliding with the drain.
Modular bins for a very narrow cabinet
Small vanities often defeat standard under-sink systems. A few modular bins are easier to fit around irregular plumbing and easier to remove one at a time.
A small turntable for bottles in one clear side zone
If one side is open but deep, a compact turntable can keep bottles visible without forcing you to reach behind several products. Check that it can rotate freely without touching the pipes.
A removable waterproof tray or mat for the cabinet floor
A wipeable base layer can help contain product spills and make the cabinet easier to clean. It should be removable so you can inspect the cabinet floor instead of hiding moisture underneath permanently.
Build Four Storage Zones Inside the Cabinet
A simple zoning system makes under sink bathroom organization easier to maintain. Once the organizer type fits the plumbing, divide the cabinet by function. This prevents the space from turning into one large pile again.
Zone 1: Front access
Use the easiest-to-reach area for products you use often. A daily cleaning spray, current soap refill or frequently used personal-care item belongs here before a product you touch once a month.
Zone 2: Left-side category
Give the left side one clear purpose. It might hold cleaning supplies, personal-care backups or one person's products in a shared bathroom.
Zone 3: Right-side category
Use the opposite side for a second defined category. Keeping categories separate makes it easier to know where something belongs after you use it.
Zone 4: Plumbing access
Keep the central service area mostly empty. If a lightweight item sits near it, make sure it can be removed immediately without disassembling the rest of the cabinet.
Organize by Category, Not by Bottle Size
A cabinet can look neat and still be frustrating if unrelated items are mixed together. Group products by what they are used for, then give each group one bin, drawer or side zone.
Cleaning supplies
Keep bathroom cleaning products together so you can remove the group quickly. Avoid spreading cleaners across several small containers just to fill empty gaps.
Toiletry backups
Keep only a practical working reserve under the sink. Bulk inventory can overwhelm a small vanity quickly. Our guide on how to organize a small bathroom with no storage explains why backup products often work better in a separate storage zone outside the bathroom.
Hair and grooming items
Use one contained area for brushes, styling products or grooming tools that genuinely belong in the bathroom. If an appliance is rarely used there, consider storing it somewhere else instead of forcing it under the sink.
Personal-care items
Keep daily or weekly personal-care items in a defined bin or drawer. In a shared bathroom, separating by person can work better than combining everyone's products by bottle type.
Sharing One Vanity? Divide the Cabinet by Person
When two people share a small bathroom, the under-sink cabinet can become confusing even when there is enough physical room. A simple ownership rule usually works better than adding more organizers.
Use the left side for Person A, the right side for Person B, and reserve one front or upper area for genuinely shared products such as soap refills, toilet paper or cleaning supplies. Each person should be able to remove their own bin or drawer without disturbing the other side.
This setup also makes duplicates easier to spot. If both personal zones contain several half-used versions of the same product, you can reduce inventory instead of buying another container.
Protect the Cabinet Before You Organize It
Under-sink storage should be easy to clean and easy to inspect. Choose containers that can be wiped down and avoid using cardboard as permanent storage in an area where spills or moisture are possible.
The EPA WaterSense home-maintenance guidance recommends looking under sinks for leaks at pipe connections, puddling, or other water spots. Keeping the plumbing visible makes those checks much easier.
A removable waterproof tray or mat can make cleanup easier, especially beneath bottles that may leak. Keep products upright and do not pack the cabinet so tightly that you cannot see the floor or plumbing connections.
During normal bathroom cleaning, take a quick look inside the vanity. If you notice dampness, staining or an unusual smell, clear the area and investigate the source rather than organizing over it.
Common Under-Sink Organization Mistakes
Most under sink bathroom organization problems are not caused by a lack of products. They happen because the layout ignores the cabinet's real constraints.
- Buying organizers before measuring clear space around the pipes.
- Treating the cabinet as one rectangle instead of several usable zones.
- Blocking shutoff valves or hiding pipe connections.
- Choosing drawers that are too tall for the P-trap.
- Filling the plumbing-access zone because it looks empty.
- Putting rarely used products in the easiest-to-reach position.
- Using too many tiny containers that create extra steps.
- Keeping more backup inventory than the bathroom needs.
- Ignoring hinge and door clearance.
If the cabinet still feels crowded after you organize it, remove inventory before adding another organizer. Storage should make access easier, not create another layer to move out of the way.
A Simple 15-Minute Under-Sink Reset
If the cabinet is already chaotic, do not begin by shopping. Do one fast reset first. You may discover that you need fewer organizers than you expected.
- Remove everything from the cabinet.
- Wipe the floor and check for moisture.
- Identify the plumbing and valve access zone.
- Take the six clear-space measurements.
- Group the remaining products by category.
- Move unnecessary backup inventory elsewhere.
- Return only the categories that fit the available zones.
- Leave the plumbing area visible and reachable.
After the reset, live with the simplified cabinet for a few days. Then buy only the storage pieces that solve a specific remaining problem, such as poor access at the back or unused vertical space beside a pipe.
Before You Buy: Use This Final Fit Checklist
A promising organizer can still be the wrong choice if one small clearance is off. Run through this checklist before you order anything for the vanity.
Good candidates for under-sink storage
The best items for this cabinet are products that benefit from being close to the sink and are easy to contain. Think current bathroom-cleaning supplies, a limited number of toiletry refills, spare hand soap, grooming items used in the bathroom and other categories that can sit upright in a bin or drawer.
Keep the amount realistic. One active refill can be useful; four large backup bottles may consume the entire cabinet. The goal is convenient access, not turning a small vanity into the household stockroom.
Items that may work better somewhere else
Bulky towel stacks, large paper-product packages, rarely used appliances and long-term backup inventory often work better in a hall closet, bedroom storage area or another dry location. Moving these categories out can create enough space to organize the products you actually need near the sink.
When deciding, ask one question: does this item need to be within arm's reach of the bathroom sink? If the answer is no, it does not automatically deserve under-sink space.
- The organizer fits the measured clear width, not just the cabinet opening.
- The tallest point clears the P-trap and supply lines.
- Pull-out parts can move without hitting the door or hinges.
- Shutoff valves remain visible and reachable.
- The organizer can be removed quickly if the plumbing needs attention.
- The product solves a real access or category problem instead of simply filling empty space.
If one of these checks fails, choose a smaller or more modular option. A simple bin that fits cleanly is more useful than an elaborate system that blocks the plumbing or cannot open fully.
Frequently Asked Questions
How do you organize under a bathroom sink with pipes in the middle?
Measure the clear width on both sides of the plumbing and use two narrow organizers instead of one wide unit. Keep the center around the P-trap and valves open for access.
What type of organizer works best around plumbing?
The best type depends on the pipe position. Narrow pull-outs work well beside centered plumbing, larger two-tier systems can work on a clear off-center side, and short stackable drawers suit low P-traps.
Should I use a pull-out organizer under the sink?
A pull-out organizer is useful when the cabinet is deep and the drawer can move without hitting pipes, valves, hinges or the closed door. Measure the full travel path before buying.
What should I store under a bathroom sink?
Use the cabinet for frequently used toiletries, cleaning supplies and a limited amount of backup inventory. If the bathroom has very little storage overall, move bulk backups elsewhere instead of forcing everything under the sink.
How can I protect the cabinet from leaks or spills?
Use wipeable containers, keep products upright, leave plumbing visible and consider a removable waterproof tray or mat on the cabinet floor. Avoid packing the space so tightly that moisture would be difficult to notice.
Work With the Pipes Instead of Fighting Them
Good under sink bathroom organization is not about fitting the largest possible organizer into the cabinet. It is about understanding the usable space around the plumbing and giving each clear zone one purpose.
Start with the pipe layout. Measure the left and right clearances, usable depth, P-trap height and door clearance. Keep valves and connections accessible. Then choose storage that fits those measurements instead of forcing the cabinet to fit the product.
The sequence is simple: measure, map, choose, zone, maintain. When you follow that order, even an awkward vanity can become easier to use without hiding the plumbing or filling every inch.
For storage beyond the vanity, continue with our small bathroom storage ideas for renters guide.