
Small Kitchen Cookware Storage: A One-Cabinet Plan
Small kitchen cookware storage works better when the cabinet is planned around the meals you actually cook. A tall pan rack or a perfectly nested stack can both fail if the pan you reach for every evening is trapped behind three other pieces.
This small kitchen cookware storage plan uses two simple checks: your meal-core set and the number of moves needed to retrieve each piece. You will measure the cabinet, separate cookware by shape and weight, and decide where nesting or vertical storage makes sense. The goal is one useful lower cabinet, not the largest cookware collection you can squeeze inside it. If the cabinet is unusually deep and the back row keeps disappearing, use our deep kitchen cabinet organization guide to plan a pull-forward route before adding cookware organizers.

Start With the Meals You Actually Cook
List three meals you make often. Then place the pots and pans used for those meals on the counter. A household might choose a skillet for eggs and stir-fries, a saucepan for rice or oatmeal, and a medium pot for pasta or soup. Those pieces form the meal-core set.
Do not begin with a suggested number of pans. A person who cooks one-pot meals needs a different core from someone who bakes, sautés and prepares several dishes at once. Use frequency as evidence: cookware used several times a week deserves the easiest position.
Move duplicate sizes, specialty pieces and cookware used only for holidays into a second group. You are not deciding what to discard. You are identifying which items should control the layout of the main cabinet.
Map Every Piece by Shape, Weight and Care
Cookware does not behave like a stack of matching plates. Long handles cross the cabinet, helper handles catch on dividers, and lid knobs consume more height than their glass or metal discs suggest. Grouping pieces by shape makes these conflicts visible.
Thin pans with long handles
Frying pans, sauté pans and griddles may nest compactly, but the handles need a clear direction. Line up the handles instead of letting them cross. If a pan has a helper handle, measure the complete span from the tip of the long handle to the far edge of the helper handle.
Bulky pots and deep vessels
Saucepans, Dutch ovens and stockpots occupy height and depth. Their stable bases often make them better candidates for the cabinet floor. Keep heavy cookware low, and avoid any arrangement that requires lifting a heavy pot over shoulder height.
Pot lids
Lids are shallow but awkward. Count them separately, measure the largest diameter and include the knob or handle in the height measurement. A lid organizer should hold the rim without forcing the knob against the shelf above.
Surfaces that need protection
Check each manufacturer’s care instructions before placing one cooking surface against another. All-Clad’s use and care guidance, for example, recommends pan protectors or soft liners when cookware is stacked. A storage method must protect the finish as well as save room.
Measure the Cabinet and the Removal Path
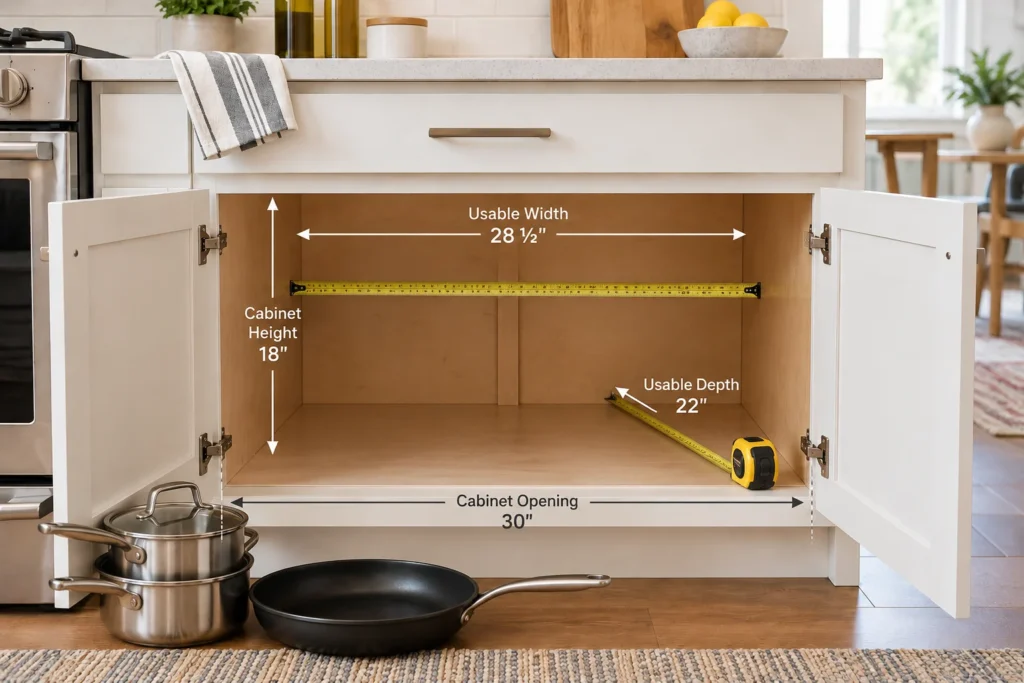
Empty the cabinet and record its usable width, depth and height. Then measure the clear door opening. Face frames, hinges and doors can reduce the space available for removing a pan even when the interior is wide enough.
- Measure the narrowest clear width between the open door, frame and hinges.
- Measure depth from the inside front edge to pipes, shelf supports or the back wall.
- Record the height below every fixed shelf.
- Measure the longest pan handle and the widest helper-handle span.
- Measure the tallest protected stack and the largest lid, including its knob.
Next, hold each large piece at the opening and follow the path it takes into the cabinet. A skillet may fit diagonally but hit the opposite door during removal. This route test is especially important in a corner cabinet or a cabinet beside an appliance.
Apply the same fit-first method used in our guide to storing baking sheets and cutting boards: an organizer must fit the opening and the retrieval path, not just the interior dimensions.
Test Small Kitchen Cookware Storage by Move Count
Now retrieve every piece as if you were cooking. Count how many other items must move before your hand reaches it. Opening the cabinet door does not count; lifting or shifting another pan does.
- Zero-move position: the pan or pot comes out directly. Give these positions to the meal-core set.
- One-move position: one light item must be lifted or shifted. Use this for regular but less frequent cookware.
- Multi-move position: several pieces block access. Reserve this only for rarely used cookware, or change the layout.
Repeat the count when returning each item. A skillet that comes out easily but requires rebuilding a stack afterward is not truly in a zero-move position. The outgoing and return routes should both feel clear.
Choose Protected Nesting or Vertical Storage
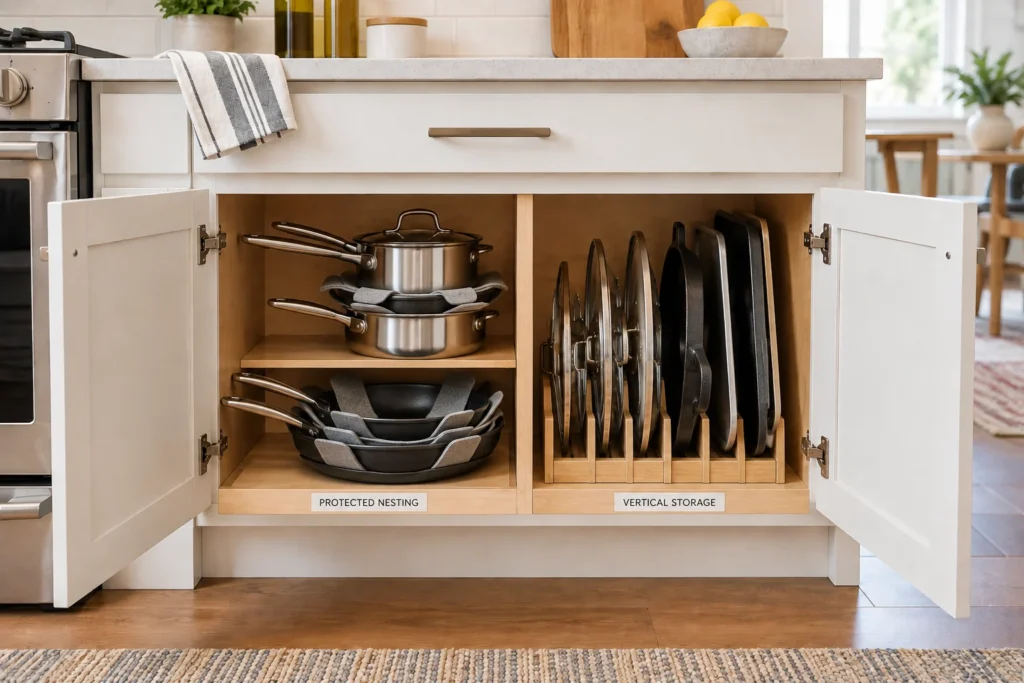
Nesting is often the most space-efficient choice for pots with graduated diameters. Vertical storage can reduce lifting for thin pans, but the rack itself consumes width and may not support every handle or base. Compare both methods inside the measured cabinet.
| Method | Useful when | Main check | Possible drawback |
|---|---|---|---|
| Protected nesting | Pots or pans fit closely by size | Daily piece stays on top or in a short stack | Lower pieces require lifting |
| Vertical rack | Several thin pans fit on edge | Rack, handles and pans clear the opening | Dividers consume width |
| Single-piece slot | One heavy or daily item needs direct access | Piece slides out without crossing another zone | Leaves less room for a large collection |
| Hybrid layout | Pots nest well but skillets do not | Both zones fit without blocking the door path | Requires careful measurement |
Test with the cookware you own before buying a rack. Make temporary dividers from folded cardboard to estimate slot widths. Cardboard is only a sizing aid; remove it after the test and choose a stable organizer intended for cabinet use.
Protect Cookware When It Nests
Build short stacks around frequency. Place the widest stable pot at the bottom, then add only the pieces that can sit without rocking. Keep the meal-core pan on top, or give it a separate front slot.
Use the protective material approved by the cookware manufacturer between vulnerable surfaces. Do not assume that one liner suits stainless steel, nonstick, enameled cast iron and bare cast iron equally. Also dry every piece before storage.
Cast iron needs particular attention to moisture. Lodge’s cast-iron guidance advises storing cookware in a cool, dry place and placing folded paper towels between a lid and its vessel to allow airflow. Follow the directions for your exact cookware rather than copying a generic stack.
Give Pot Lids a Separate Measured Lane
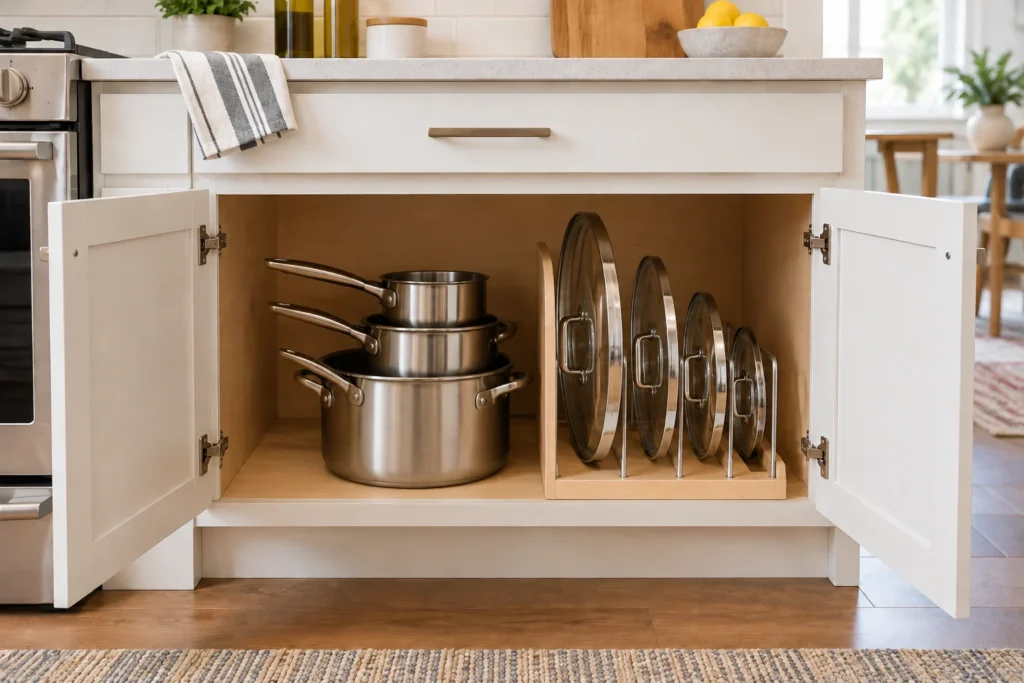
Lids usually work better in one narrow lane than on top of every pot. Sort them from largest to smallest and test whether they can stand upright without the knobs colliding. Keep the lids for meal-core cookware at the front.
A freestanding adjustable holder can work when its outside dimensions match the lane. For scale, the official IKEA VARIERA pot-lid organizer lists an adjustable length of 3 1/4 to 19 3/4 inches, a width of 5 3/4 inches and a height of 4 inches. Those measurements are an example, not a universal recommendation. Include your lid knobs and the space needed to grip each lid.
If the cabinet cannot spare a lid lane, store two or three compatible lids upright beside the pots and move surplus lids elsewhere. Avoid a loose horizontal pile that must be searched every time. The same principle helps with smaller pieces in our shallow-drawer food-container-lid plan.
Build a Small Kitchen Cookware Storage Layout
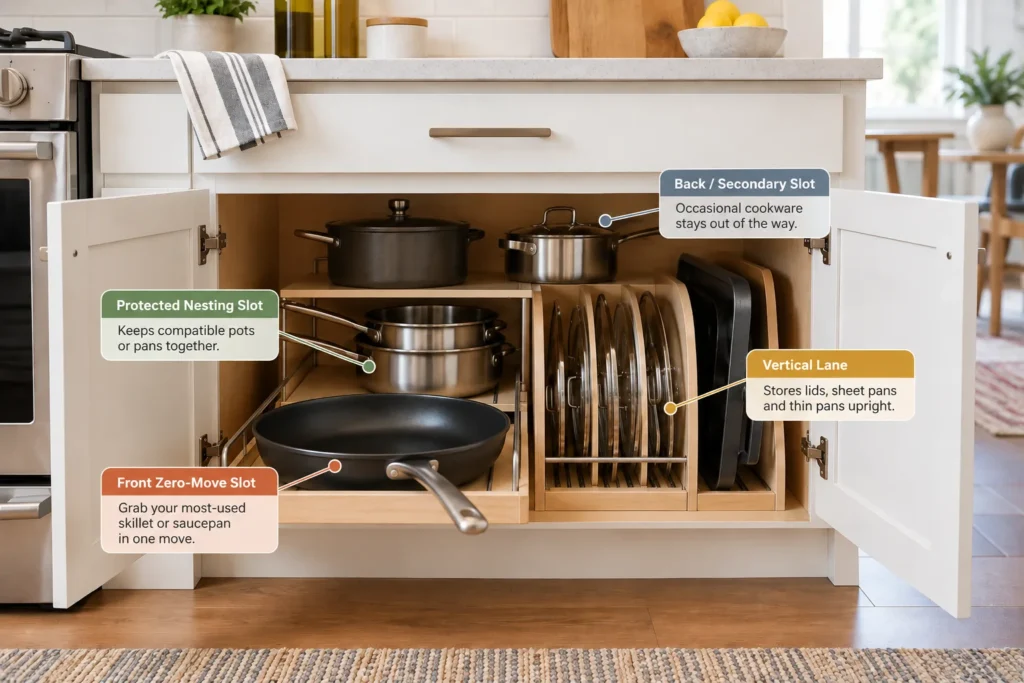
Divide the lower cabinet into four practical zones. The exact widths will depend on your cookware, so let the measurements decide how much space each zone receives.
1. Front zero-move slot
Place the most-used skillet or saucepan at the front with its handle facing the easiest direction. It should leave the cabinet without disturbing a lid, rack or neighboring stack.
2. Protected nesting slot
Create one short stack of compatible pots or pans. Put the most frequently used piece highest and stop adding items when the stack becomes awkward to lift or return.
3. Vertical lane
Use this measured lane for thin pans or pot lids only if they remain supported and clear the opening. Do not force a deep pot into a narrow divider.
4. Secondary back or upper slot
Place lightweight, occasional cookware behind the core only when it does not block daily items. A fixed upper shelf can hold light accessories, but heavy cookware should stay in the lower, well-supported zone.
Check Freestanding Organizers Before Buying
An organizer’s advertised capacity is less important than its complete footprint. Record its outside width, depth and height, including feet, handles and protruding dividers. Compare those numbers with the cabinet opening and with the cookware loaded into it.
- Check the manufacturer’s load and installation instructions.
- Confirm that the base stays flat and does not rock on the cabinet floor.
- Test whether handles collide when neighboring pans are removed.
- Leave finger room instead of matching the opening exactly.
- Return any organizer that creates more moves than the original layout.
For a rental, start with a freestanding rack or shelf insert. A door-mounted, pull-out or wall-mounted system may require screws, cabinet reinforcement or landlord permission. Our broader small-kitchen storage plan for renters offers other no-drill places for items that do not fit this cabinet.
Common Small Kitchen Cookware Storage Mistakes
- Buying a rack before measuring: the organizer may fit inside but fail to clear the frame or hinge.
- Putting every pan vertically: deep pots and curved handles can waste more space on edge than they use in a protected stack.
- Building one tall stack: frequent lifting turns the bottom pan into unusable storage.
- Ignoring the return route: a system is incomplete if the cookware is difficult to put away.
- Storing damp cast iron: trapped moisture can undermine an otherwise tidy layout.
- Keeping duplicates in the prime zone: rarely used pieces take the zero-move positions needed for everyday cooking.
Frequently Asked Questions
Is it better to stack pans or store them vertically?
Neither method is always better. Protected nesting usually uses less width, while vertical storage can give thin pans more direct access. Choose the method that fits the cabinet and gives your daily cookware the lowest move count.
How should heavy pots be stored in a small kitchen?
Keep heavy pots in a lower cabinet on a stable surface. Give a frequently used heavy piece direct access so it does not need to be lifted over other cookware. Follow the cabinet and organizer manufacturer’s load guidance.
Can pot lids be stored on a cabinet door?
Only when the door, hinges and mounting system are designed for that load and the installation is permitted. A freestanding measured lid lane is the simpler starting point for renters and for anyone uncertain about the cabinet construction.
What cookware should stay in the main cabinet?
Keep the pots and pans used for your three most frequent meals in the main cabinet. Add other regular pieces only when they do not block that meal-core set. Specialty and seasonal cookware can move to secondary storage.
What if the cabinet is too narrow for a pan rack?
Use a short protected stack, align the handles and reserve one front position for the daily pan. A rack that consumes too much width is not necessary. Move an occasional piece elsewhere if that reduces the number of daily retrieval moves.
MistakesLet Daily Cooking Set the Layout
Reliable small kitchen cookware storage begins with the cookware that supports your real meals. Measure the cabinet and removal path, keep the meal-core set within zero or one move, and choose protected nesting or vertical storage according to the shapes you own.
A cabinet does not need to hold every pot and pan to work well. When the daily skillet comes out directly, lids have a measured lane and delicate surfaces are protected, one lower cabinet can support everyday cooking without a complicated renovation.