
Small Kitchen Storage Ideas for Renters: A Prep-First No-Drill Plan
If dinner starts with moving the toaster, shifting a dish rack and balancing a cutting board beside the sink, extra shelving may not solve the real problem. The most useful small kitchen storage ideas for renters give you somewhere to work while keeping everyday dishes and tools within reach.
Start with a Prep-First Space Map: identify where you prepare food, cook, wash dishes and store supplies. Then check what fits inside the cabinets before giving another organizer a place on the counter. This guide includes a worked cabinet example, three clearance checks and a meal test you can try before spending money.
No-drill options still need to suit your lease, surfaces and appliance instructions. Choose them by the job they improve: retrieving a mug, drying a pan or clearing room to chop vegetables.
Start With the Prep-First Space Map
Before you shop for a rack, map the work your kitchen must support. In a small rental, a single strip of countertop might be your chopping station, grocery-unpacking area and place to set a hot pan. Filling it with attractive organizers can make storage look better while making cooking harder.

Prep: protect a usable work surface
Choose a clean, stable section of counter for cutting, mixing and assembling meals. Keep enough room for your cutting board and the bowl or plate you use beside it. Rinse produce at the sink; leave the stovetop clear rather than treating it as permanent prep or storage space.
Cook: keep essentials nearby without crowding the stove
Pans and everyday utensils should be reachable, but towels, packaging, paper products and wooden utensils must stay away from burners and other heat sources. A wall rack beside the stove is only useful if its contents and placement are appropriate for that appliance and its clearance instructions.
Keep seasonings visible in a suitable nearby location with our small kitchen spice storage guide, which covers heat exposure, package sizes and retrieval.
Wash: let the sink remain functional
Dish soap, a sponge and a compact drying arrangement may belong here. Avoid stacking enough accessories around the tap that rinsing a large pot becomes difficult.
Store: put the rest in measured homes
Cabinets, drawers, suitable door backs and a truly usable narrow gap are storage opportunities. Assign one role to each before buying containers. Small Space Scout rule: save the space you need to cook before trying to store more.
If groceries compete with dishes for cabinet space, use our small kitchen with no pantry organization guide to separate daily food from reserve stock.
Empty the Counter Before Adding Storage
The fastest useful improvement is often moving objects rather than adding furniture. Empty the counter temporarily and return only the things that must stay accessible there: perhaps an everyday coffee maker, a dish-drying solution or a small utensil holder. Your actual routine determines the answer.
Run a normal-meal test
Put your cutting board on the counter and imagine preparing dinner. Where will washed ingredients land? Where will you place a mixing bowl? Can you safely set down a plate without shifting three containers? The remaining open surface is working space, not wasted storage.
Choose which appliances earn a permanent position
An appliance used daily may justify its footprint. A specialty machine used once a month may belong in a reachable cabinet or another suitable location. Check appliance-specific ventilation, cord, heat and storage instructions before moving it. Never bury a plugged-in appliance under shelves or conceal cords behind crowded organizers.
Do not buy a two-tier countertop shelf just because it adds vertical capacity. If its legs occupy the only flat prep area or its upper shelf blocks access to cabinets, it has solved the wrong problem.
Sort Kitchen Inventory by Frequency and Shape
Pull together dishes, cooking tools, dry foods and small appliances by category. You do not need to discard useful items to make an attractive photo; you need to see how much working inventory you are trying to fit into the room.
Everyday items
Give frequently used plates, mugs, cookware and ingredients the easiest reach. Keep the most common items accessible without unloading a stack of seldom-used pieces first.
For pots, pans and their lids, follow our small kitchen cookware storage plan to build a cabinet that lets everyday pieces come out easily.
Occasional and backup items
Seasonal bakeware, serving pieces and unopened dry-food duplicates can use less convenient storage when conditions are appropriate. If you have an existing cabinet above the refrigerator, use our above fridge cabinet organization guide to check reach, appliance clearance and safe retrieval before assigning occasional items there. Keep food in accordance with its packaging and storage instructions, and do not move perishables to room-temperature storage to clear refrigerator space.
Awkward shapes need their own plan
Cutting boards and baking sheets are thin and tall; mugs are short with handles; pot lids vary in diameter. Match organizers to actual shapes rather than buying matching bins for every category. If a large appliance simply will not fit a cabinet, record its footprint instead of forcing it through the door.
Our guide to storing baking sheets and cutting boards explains how to test an upright layout against divider spacing, cabinet height and the removal path.
Measure the Three Clearances Before Buying
Measure the inside of each space, not the outside of the cabinet or the product packaging. A flexible tape measure and a quick sketch can prevent several unnecessary purchases.
Interior fit
Record usable width, depth and height. Note shelf pins, hinges, pipes, outlets and cabinet framing. For a riser, measure the tallest object underneath it and the remaining clearance for anything placed above it.
Door and drawer movement
Open the cabinet fully. A hanging rack can fit the door panel but collide with a shelf, drawer pull, dishwasher or neighboring handle. Load-bearing organizers also need the exact mounting and weight conditions in their instructions.
Room circulation
Pull out the refrigerator drawer, open the oven door and walk through the kitchen while imagining the proposed cart or stool in position. Measure how far shelves, bins and their handles project into the path. A slim product is not necessarily slim enough for your layout.
Fit test: mark the proposed organizer footprint with removable paper on a dry surface and test nearby doors before purchasing. Do not put tape where it could damage a finish.
A cabinet fit example: a riser can fit and still fail
Illustrative example, not a tested product: imagine a cabinet with 16 inches of usable width, 11 inches of depth and 12 inches of height. A riser measuring 15 inches wide and 10 inches deep, with 6 inches of clear space beneath its shelf, appears to fit. If that shelf is half an inch thick, its top sits 6½ inches above the cabinet floor, leaving only 5½ inches above it. A 6-inch-tall mug cannot stand on that upper level.
The lower space also needs checking. An outside riser width of 15 inches does not mean a 15-inch bowl can pass between its legs. Compare the clear opening between the legs with the bowl, then check whether you can lift it out without scraping the shelf above.
For your own cabinet, write down four things: the interior size, the organizer’s outside size, its usable openings and the size of the objects you want to store. A paper footprint checks width and depth; a cardboard side profile helps you check height. These are fit checks only, not load tests.
Use Cabinet Height With Removable Shelf Risers
Many cabinets contain air above stacks of short items. A freestanding shelf riser can split that height into two usable levels without changing the cabinet itself. It is a starting option for mugs, small bowls or similar lightweight objects only when the riser is designed for that load.

Measure the useful opening
Compare the internal shelf width and depth with the riser’s outside footprint. Include its leg spacing and the usable height below it. An organizer that technically fits may leave too little space to lift a mug out comfortably.
Do not load beyond the rating
Follow both the organizer and cabinet shelf instructions. Avoid stacking heavy cookware high on an unverified lightweight riser or placing fragile dishes where retrieving them requires awkward overhead lifting.
Make the shelf easier, not denser
If items must be removed from the top tier every time you need something below, try a simpler layout. More vertical layers only help when each layer remains accessible.
If the problem is hidden items at the back rather than unused height, our deep kitchen cabinet organization guide shows how to make rear groups pull forward.
Check Cabinet-Door Storage Carefully
The inside of a cabinet door may hold lightweight accessories, small bags or compatible racks, but only when the organizer leaves the cabinet functional. Door-mounted products are not universally compatible with every rental cabinet.
Match the hardware to the door
Check thickness, hinge style, hardware, closing gap and the manufacturer’s mounting method. Screwed-in racks may require permission. Adhesive products may damage certain finishes or fail on unsupported surfaces, so follow the product’s compatibility and removal directions.
Load the whole cabinet before deciding
With the organizer installed in your proposed position, could the door close around the pots, baskets and shelf edges already inside? Do not trade accessible cookware for an unusable door.
Cabinet-door storage should contain appropriate items only. Avoid hanging heavy cookware or glassware from a door without a specifically rated and compatible system.
Organize Drawers Around the Tasks They Support
Small kitchen drawers are easiest to use when a few logical groups stay visible: everyday cutlery, cooking utensils, measuring tools and miscellaneous accessories that genuinely need to live in the kitchen.
For a slim utensil drawer, use our narrow kitchen drawer organization guide to plan around real utensil lengths and closing clearance.
Choose dividers after measuring
Measure interior width, depth and closing height. A divider insert may fit the drawer opening yet waste space beside the walls; expandable products may interfere with a tapered drawer or hardware. Test long utensils with the drawer closed before buying narrow trays.
Keep sharp tools appropriately secured
Use suitable storage for knives and other sharp implements, particularly where children may have access. Do not leave loose knife blades mixed with everyday cutlery in an open drawer.
Leave one adaptable zone
A small open compartment can accommodate an item that does not match the standard tray. You do not need a tiny cell for every object. The goal is to locate and return utensils quickly.
If loose food-container lids take over that space, our guide to storing food container lids in a shallow drawer helps keep matching sizes visible and easy to return.
Work Around the Plumbing Under the Kitchen Sink
The cabinet beneath the sink can be useful, but it is not simply an empty rectangle. Drain pipes, supply lines, a garbage disposal and shutoff valves can all reduce usable depth and height. Keep plumbing accessible and investigate any leak rather than hiding it behind bins.

Draw the pipe footprint first
Measure the available space on either side of the plumbing. Short removable bins can fit irregular gaps better than one large pull-out unit. Check whether a pull-out tray can move without hitting hardware or pipes.
Keep cleaning products separate from food
Follow each product’s label, keep chemicals in their original labeled containers and out of children’s reach, and do not put cleaning supplies beside unpackaged food or food-contact items where leakage could contaminate them. A child-accessible low cabinet is not automatically suitable for hazardous products.
Do not block maintenance access
Leave enough room to reach shutoff valves and inspect for moisture. A storage solution is not an improvement if it prevents a leak from being noticed or makes repairs harder.
Use the Refrigerator Exterior Only When Appropriate
Some refrigerators offer a usable exterior side that can take a compatible magnetic organizer for lightweight non-food items. Others have a nonmagnetic finish, a built-in surround or essential ventilation clearances that make this a poor location.
Check the actual surface
Test the magnet gently, confirm the refrigerator manufacturer’s clearance requirements and avoid blocking vents, controls, door seals or access for service. Do not assume a rack is suitable merely because it sticks.
Mind what projects into the room
A basket that protrudes into a tight galley can catch bags, sleeves or passing people. Measure with the refrigerator door fully open. Do not store knives or other hazardous items on an exposed rack where children can access them.
This is an optional tool for an appropriate surface, not a necessary purchase for every small kitchen.
Choose Dish-Drying Storage Without Losing the Sink
A drying rack can claim a remarkable amount of a tiny counter. A correctly sized over-sink or in-sink drying arrangement may help, but only if it allows safe access to the faucet and does not overload the sink or obstruct normal washing.
Measure the sink opening
Record usable basin width and how the rack is supported. Check the actual load rating and whether the supports rest on a suitable stable surface. Leave space to wash large pots and to use the tap safely.
Let items dry before closed storage
Do not pile still-damp dishes into enclosed cabinets simply to make the counter look clear. Choose an arrangement you can use and clean regularly.
Consider a removable routine
If a drying rack blocks the only large sink, a compact rack that is put away after dishes dry may work better than a permanent over-sink tower.
A Slim Rolling Cart Must Pass the Walkway Test
A cart can add flexible pantry or cookware storage, but it is also a piece of furniture. Measure the entire gap, including baseboards and door handles, rather than buying by the cart’s headline width. Count the handles and wheel projection in its actual footprint.
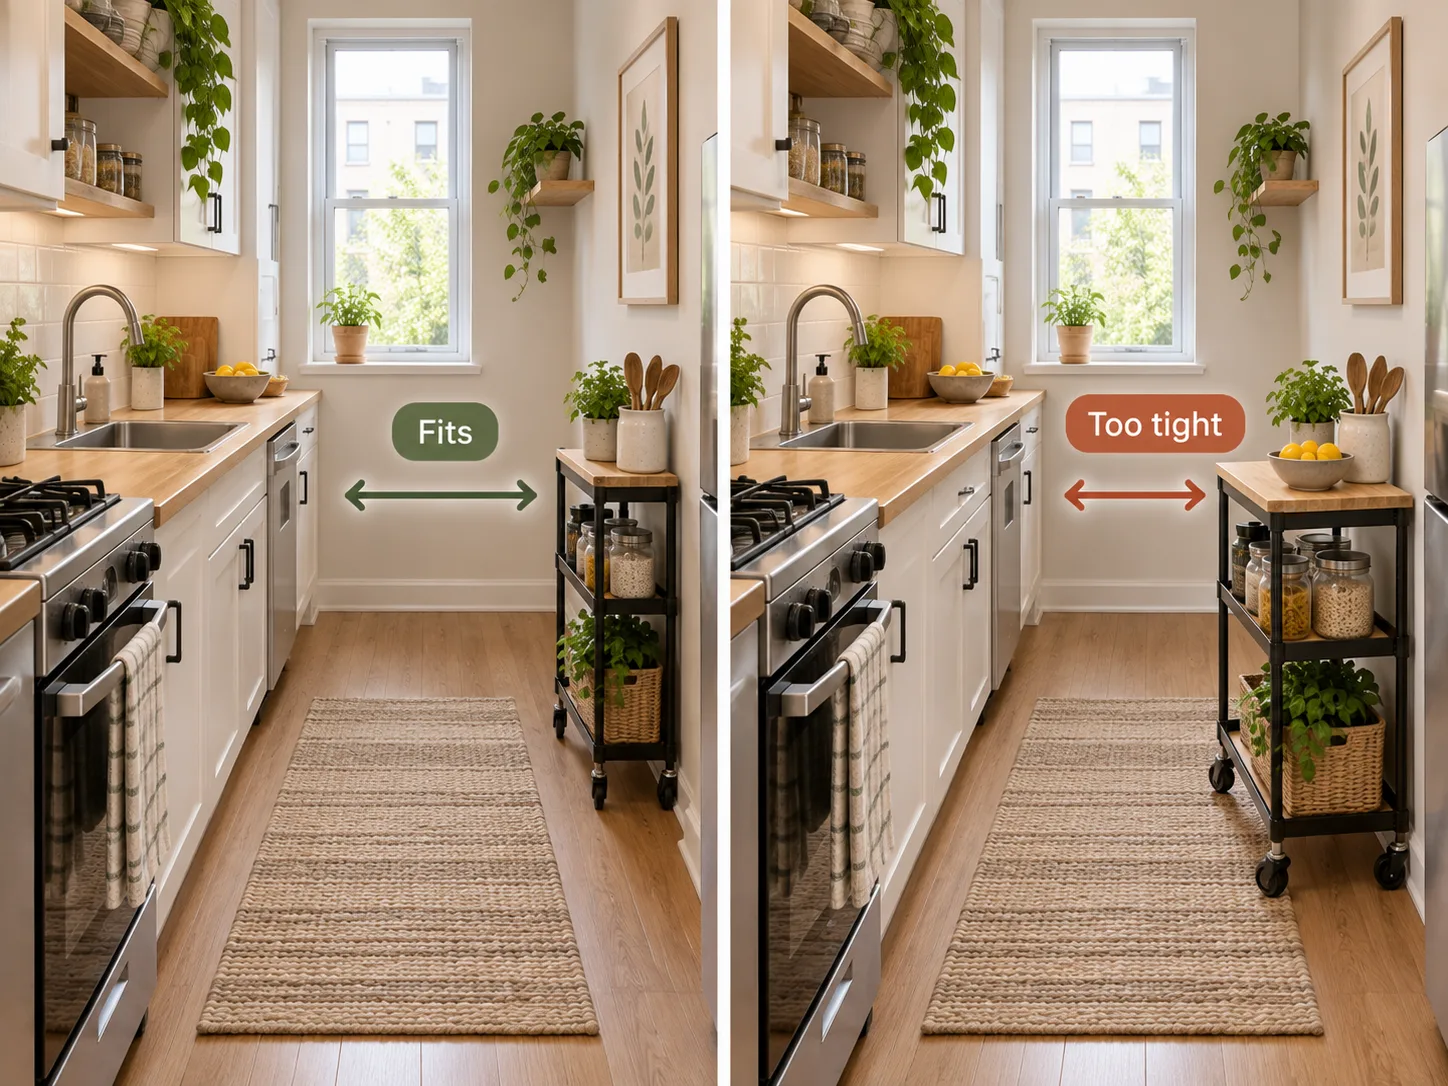
Test it in its loaded position
Open the oven, refrigerator, dishwasher and adjacent cabinets. The cart must not block appliance ventilation, doors, a safe walking route or an exit. Use its stated capacity and assembly instructions; heavier items generally belong on lower shelves according to the product’s guidance.
Make it earn its floor space
If pulling it out blocks cooking or requires moving another piece of furniture, a cabinet insert may solve the problem with less disruption. An attractive cart should not replace the prep and movement space your kitchen needs.
Understand What No-Drill Really Means in a Rental
Freestanding risers, removable bins and fitted drawer dividers generally need no wall mounting. Tension systems, magnets, adhesive mounts and over-door products all have separate compatibility constraints. No drilling is not a promise of damage-free removal.
Check the lease and the specific surface
Review rental rules before mounting anything. A product approved for smooth tile may not suit painted walls, a delicate veneer or a hot or greasy backsplash. Follow preparation, drying time, maximum load and removal instructions.
Do not use adhesives as a shortcut around load limits
Heavy cookware, glassware and tall items need stable storage designed for their weight. Do not place a loaded overhead rack above an active work area without an appropriate installation and rated system.
When a product needs screws, anchors or permanent changes, obtain appropriate permission rather than presenting it as a renter-safe no-drill solution.
Keep Storage Out of Heat, Food and Traffic Hazards
A small kitchen still needs clear safety boundaries. Do not use the stove or oven as a place to store groceries, bags, cutting boards or organizers. The National Fire Protection Association advises keeping combustible items, including oven mitts, towels, food packaging and wooden utensils, away from the stovetop. Read NFPA cooking safety guidance.
Protect food-preparation areas
FoodSafety.gov advises cleaning hands, utensils and food-preparation surfaces and separating raw animal foods from ready-to-eat items to reduce cross-contamination. Organizers should support that routine rather than crowd the surface so thoroughly that it cannot be cleaned. Read the four steps to food safety.
Follow appliance-specific instructions
Do not place racks over burners or vents, hang textiles beside heating elements, obstruct appliance airflow or hide active power cords under organizers. When you cannot identify a safe location for an accessory, choose a different storage area.
Match the Storage Type to the Problem
Compare the problem you actually have with the type of organizer that may address it. These are starting points, not product endorsements or guarantees of fit.
| Problem | Consider | Verify first |
|---|---|---|
| Unused height in a cabinet | Freestanding riser | Clearance and load |
| Long utensils in a chaotic drawer | Adjustable dividers | Interior depth and height |
| Awkward under-sink cabinet | Removable short bins | Plumbing and product safety |
| Appropriate free fridge side | Rated magnetic rack | Surface, ventilation and projection |
| Dish rack crowds prep space | Removable sink rack | Sink support and faucet access |
| Truly usable narrow floor gap | Slim rolling cart | Full door and walking clearance |
The cheapest first move is often to relocate seldom-used items and protect one work surface. Buy a storage product only when you can describe its exact job and where it will fit.
A Simple Pre-Buy Kitchen Storage Checklist
- Clear the counter and identify a workable food-prep area.
- Group everyday, occasional and backup items.
- Measure cabinet interior width, depth and height.
- Check door, drawer, refrigerator and oven movement.
- Map pipes, vents, outlets and other obstructions.
- Confirm lease restrictions and surface compatibility.
- Check the organizer’s load and installation instructions.
- Keep combustibles away from cooking heat and chemicals away from food.
- Test how items will be retrieved, cleaned and returned.
- Buy only the pieces that solve a measured, specific problem.
After setup, prepare one normal meal and wash the dishes. If the new system makes either job slower, simplify it before buying a second organizer.
Frequently Asked Questions
How do I add storage to a tiny rental kitchen without drilling?
Start with the cabinets and drawers you already have. Freestanding shelf risers, removable bins and correctly sized dividers can add organization without wall changes. Over-door, magnetic or adhesive products require separate compatibility checks.
What is the first thing to organize in a small kitchen?
Protect a usable prep surface. Then sort items by frequency and measure the existing cabinets before purchasing organizers.
Are adhesive kitchen shelves damage-free?
Not automatically. Surface finish, heat, grease, moisture, load, preparation and removal method all matter. Follow the specific product instructions and your rental rules.
Do rolling carts make small kitchens feel larger?
A cart can add capacity when an actual gap exists, but it can also steal walking or appliance-opening space. Measure the loaded cart’s full projection before purchasing.
How do I organize a kitchen with hardly any cabinets?
Keep the most frequently used items close, move occasional inventory to a suitable secondary location and consider compatible freestanding storage only where it does not block cooking, ventilation or movement.
Can I put organizers above the stove?
Do not improvise storage near burners or appliance vents. Follow appliance clearances and keep combustible materials away from the stovetop. Choose a safer location when the required clearance or installation is uncertain.
Should everything be decanted into matching containers?
No. Containers are useful only when they fit and improve retrieval. Retain important product labels and storage instructions; replacing every package can add expense and make some products harder to identify.
Protect the Work Surface, Then Add Only What Fits
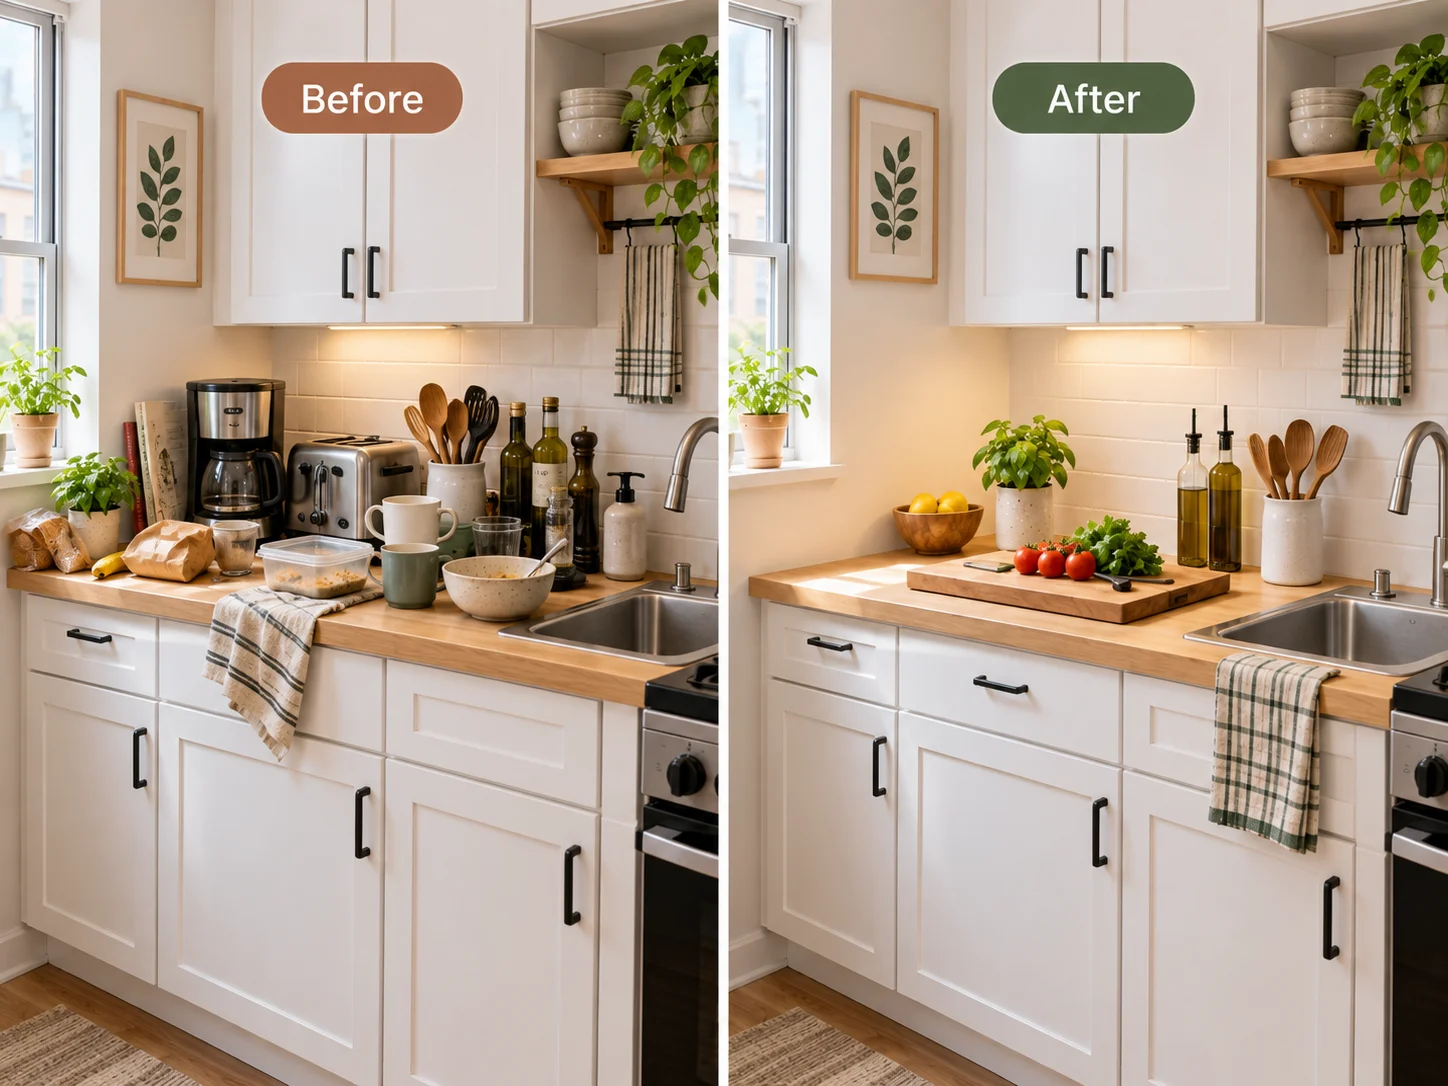
The most useful small kitchen storage ideas for renters start with a clear prep surface and a realistic map of the room. Make everyday items easier to reach, use existing cabinet height when it is safe, and measure every organizer against real doors, shelves, appliances and walking space.
Your kitchen does not need every possible rack. It needs a few storage locations that support preparing, cooking, washing and putting things away without creating new obstacles. For future room-specific guides, explore our Kitchen Organization collection or return to Small Space Scout.