
Deep Kitchen Cabinet Organization: A Pull-Forward Plan
Deep kitchen cabinet organization works when the items at the back can travel toward you. A cabinet may look spacious when empty, yet become frustrating once two loose rows of cans, bowls or food containers block one another.
This renter-friendly plan uses three moves: Front, Lift and Pull. Put everyday items in the front zone, add a second level only when both levels remain easy to reach, and place anything deeper inside a removable unit. The rule is simple: the back of a deep cabinet needs a retrieval method, not another loose row.

Decide What the Deep Cabinet Should Store
Empty one cabinet and identify the job it should perform before buying an organizer. Mixing cookware, groceries, cleaning supplies and occasional appliances in the same deep space creates several different retrieval problems. A useful cabinet usually supports one broad activity, such as breakfast food, baking supplies, meal-prep bowls or pots and pans.
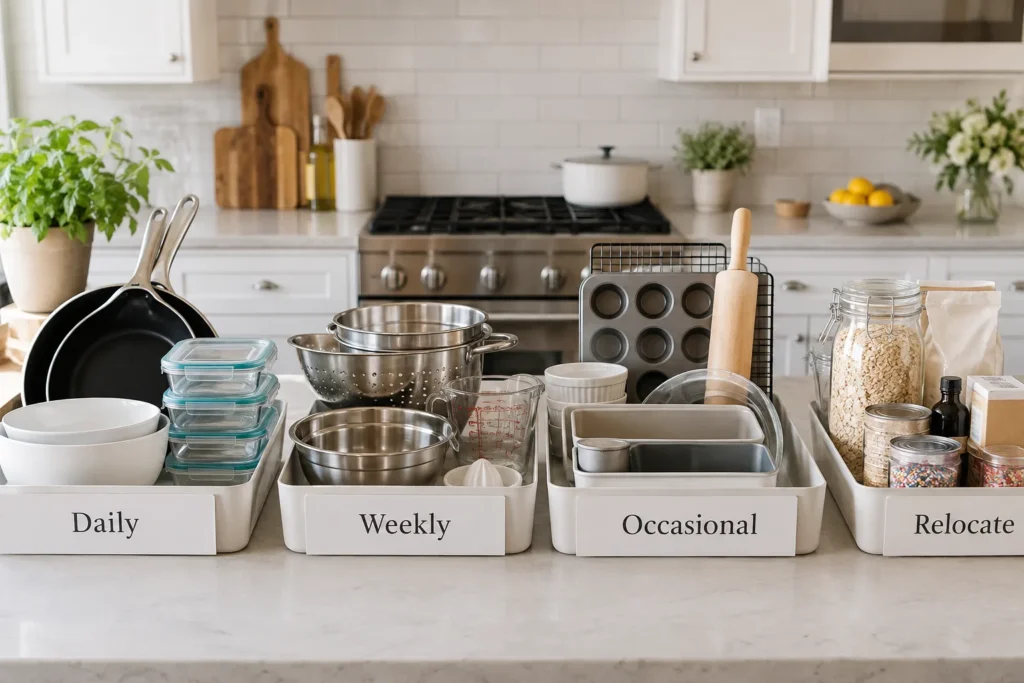
Sort the contents into four practical groups:
- Daily: items used most days and needed without moving anything else.
- Weekly: familiar items that can sit slightly deeper.
- Occasional: seasonal or specialty pieces that still need a clear retrieval path.
- Relocate: duplicates, unrelated products and items that fit another cabinet better.
Let frequency decide position. The daily group belongs within the first reach, while weekly items can share a handled bin or tray behind it. Occasional items may use the deepest zone only when the entire group can slide or lift forward. Do not make a frequently used saucepan wait behind a holiday serving bowl.
Weight changes the plan. Heavy cookware, glass containers and small appliances are safer and easier in lower cabinets. Light packages, paper goods and infrequently used plastic pieces suit upper shelves. A high shelf is not a good place for a loaded bin that must be pulled toward your face.
Check the cabinet conditions too. Dry groceries need a clean, cool and dry location. Cleaning products should remain separate from food. If the cabinet is beside an oven, dishwasher or sink, notice heat, plumbing and moisture before assigning sensitive products. Our small kitchen without a pantry plan can help choose a nearby grocery zone when one cabinet cannot do every job.
Measure the Opening, Depth and Removal Path
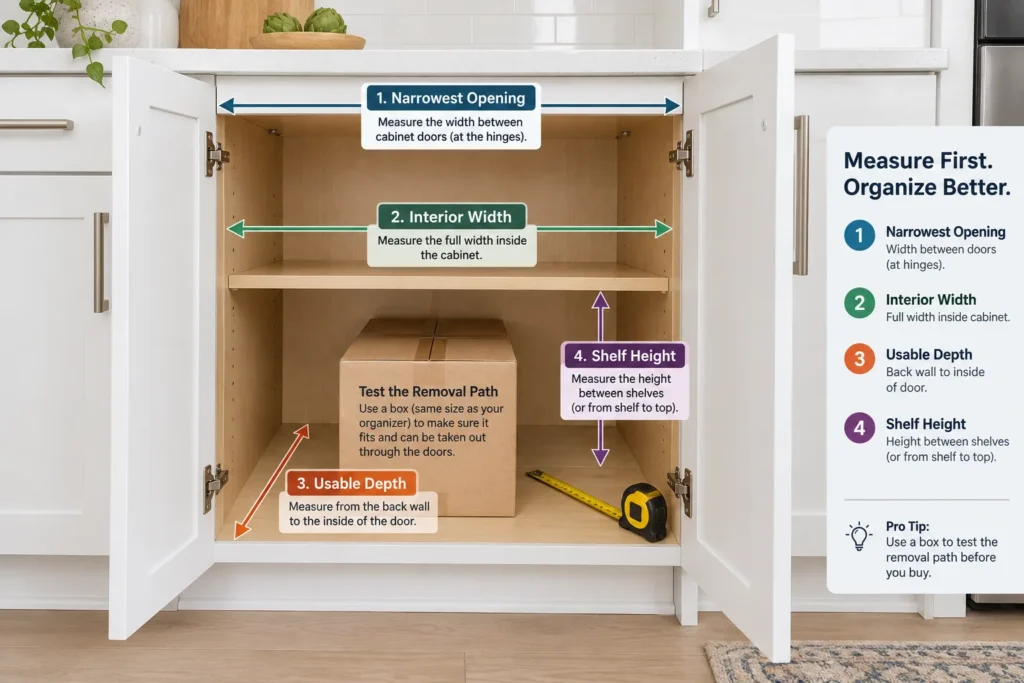
Measure the cabinet after it is empty. Record the narrowest usable opening between the face frame, hinges and door hardware; then measure interior width, usable depth and shelf height. An organizer that matches the interior width can still fail when its front edge cannot pass through the smaller opening.
Measure the tallest and widest item in the assigned category. If you plan to stack bowls or containers, measure the loaded stack rather than one piece. Leave space for fingers above a bin handle and for lids or handles that project beyond the main body.
Test the Full Removal Path
Place a cardboard rectangle cut to the organizer’s footprint inside the cabinet. Open the door fully and slide the cardboard through the real opening. Repeat the test with a box or existing bin close to the proposed height. This catches collisions with hinges, shelf lips and nearby doors before money is spent.
Check Loaded Height and Turning Space
A shelf riser needs enough space for the lower row to slide out and for the upper row to lift safely. A turntable needs clearance at every point of its rotation, including the largest package near its outer edge. A pull-out needs open floor space in front of the cabinet and a door that stays clear of the moving unit.
Manufacturer measurements describe the product, not your cabinet. Compare every dimension with the usable opening and removal path. IKEA, for example, explains that shelf inserts create extra storage levels, while full-extension drawers bring back items into reach. Treat those ideas as functions to match, then verify the exact product dimensions for your space.
Compare Deep Cabinet Organizers Before Buying
No organizer wins in every cabinet. Choose by the way the stored items move, the weight of the load and the space needed to retrieve them. The comparison below focuses on fit and daily use rather than advertised capacity.
| Organizer | Useful when | Fit check | Main drawback |
|---|---|---|---|
| Handled bin | Small items move as one group | Loaded bin clears opening and shelf | Deep opaque bins can hide contents |
| Open tray | Jars or cans need a shallow pull-forward base | Tray has a safe grip point | Items may tip if sides are too low |
| Shelf riser | Vertical space is wasted | Both levels remain removable | Front items can block the lower row |
| Turntable | Small packages rotate into view | Largest item clears walls | Round footprint leaves corner gaps |
| Freestanding pull-out | Lower cabinet needs drawer-like access | Door, hinge and floor clearance work | Frame consumes usable width |
| Vertical divider | Boards, trays or lids stand upright | Tallest piece clears the shelf | Does not solve storage for loose items |
Use handled bins for categories, not miscellaneous storage. A bin works when every item inside belongs to the same task and the loaded bin is comfortable to remove. Add a front label that remains readable when the bin is parked at the back.
Use risers only when lifting room remains. A second level creates capacity, but capacity is useful only if neither row traps the other. Test removal with the tallest real item on both levels before committing the shelf.
Use a turntable for rotation, not for every shape. For small spice jars and seasonings specifically, our small kitchen spice storage guide compares visibility, heat exposure, drawer fit, and shelf access in more detail. Bottles and small jars can rotate well; rectangular boxes and large bags often waste the corners. Keep the heaviest package near the center and test a full turn with the door open.
Build a Deep Lower Cabinet System
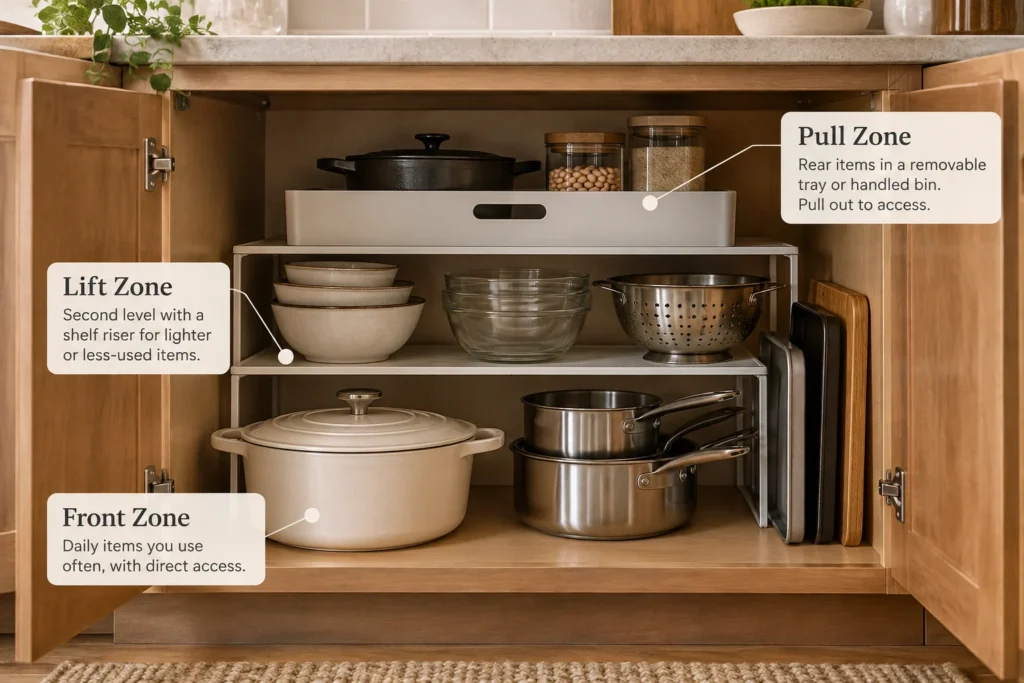
Lower cabinets can carry heavier items, but their depth encourages crouching and blind reaching. Start by placing the heaviest stable items on the cabinet floor. Keep their handles facing the opening and avoid stacking more pieces than can be lifted safely with one hand.
Use the first eight to twelve inches as the direct-access zone for everyday cookware or appliances. Put weekly items behind them only inside a tray or pull-forward bin. If a front item must be lifted before the rear group can move, the two zones are still blocking each other.
Give Heavy Cookware a Stable Base
Nest pots only when their sizes separate easily. Store frequently used lids upright in a measured divider or beside the matching cookware so the stack does not need to be dismantled. For more detail, see our small kitchen cookware storage plan.
Keep Baking Pieces Vertical
Cutting boards, baking sheets and cooling racks often work better on edge than in a horizontal pile. Check divider spacing and cabinet height with the widest board before buying. Our baking sheet and cutting board guide explains the full fit test.
Use Freestanding Pull-Outs Carefully
A renter-friendly freestanding pull-out can imitate a drawer without screws, but its frame uses width and its basket may narrow toward the base. Compare the usable basket dimensions, loaded weight guidance and door clearance. Add a non-slip pad only when the manufacturer permits it and the unit remains level.
Map the Cabinet Into Front, Lift and Pull Zones
The Front–Lift–Pull plan gives every item a movement rule. Build the zones with the real contents on the counter before ordering matching bins. The goal is a routine that still works after groceries are unpacked and dinner is finished.
1. Put Daily Items in the Front Zone
Place the most-used items where their labels, handles or lids are visible as soon as the door opens. Keep this zone shallow enough that a hand can remove one item without shifting a row. Leave a small landing space so the item can be returned quickly.
2. Lift Only When Both Levels Work
Add a riser when the cabinet has unused height and the lower row still slides out. Keep light, less-used pieces on the upper level. If the top row must be unloaded to reach the bottom, the riser has increased storage while reducing access.
3. Make the Back Zone Pull Forward
Put rear items inside a handled bin, open tray, turntable or freestanding pull-out. The full group should move toward the doorway in one action. Label the moving unit by category, such as “baking extras” or “weeknight cans,” instead of labeling every object.
4. Leave Working Space
Do not fill every inch. A small gap lets fingers reach a handle and gives changing package sizes somewhere to go. If the system works only when every item is aligned perfectly, it will fail during an ordinary rushed week.
Organize a Deep Upper Cabinet Without Overreaching
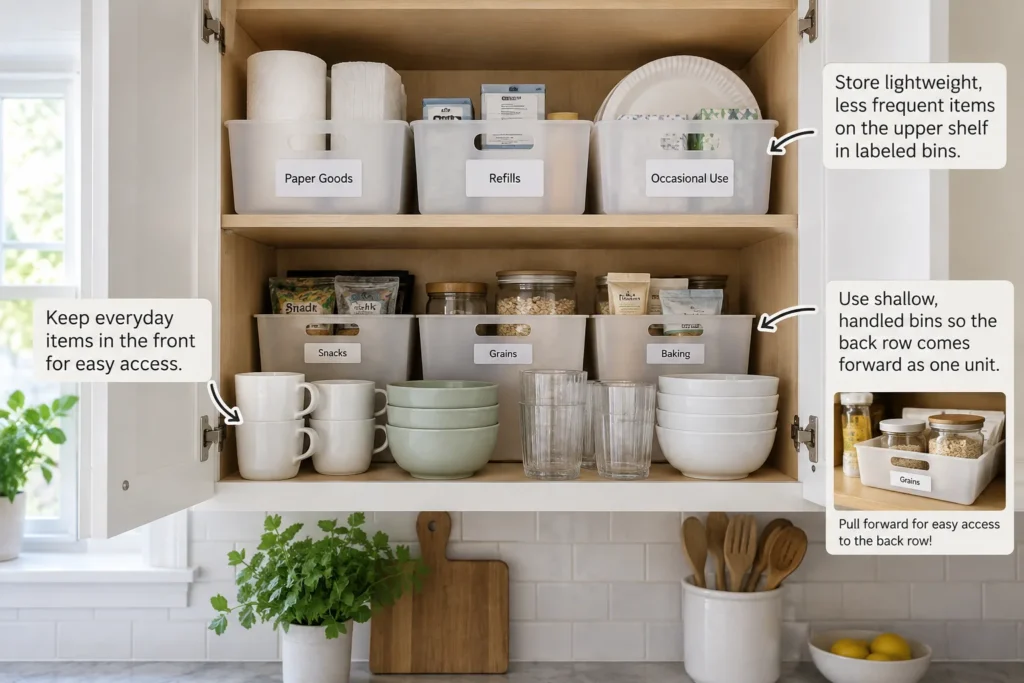
Reserve deep upper cabinets for light items that are safe to lift. Place daily mugs, bowls or dry-food packages on the lowest reachable shelf. Keep the rear of that shelf inside shallow handled bins, so the whole category comes forward without reaching blindly past the front row.
Use the top shelf for lightweight occasional pieces, refills or paper goods. For an existing cabinet directly above the refrigerator, follow our above fridge cabinet organization guide before using it as overflow; the appliance setback and removal path can make that cabinet much harder to use than a normal upper shelf. Label the lower edge of each bin because a label on the lid disappears above eye level. Avoid heavy glass, appliances and tightly packed bins that require two hands while standing on tiptoe.
A riser can make a tall upper shelf more useful when both levels remain visible. Keep the taller packages at the rear only if they can be lifted over the front level. If height or reach is limited, choose one simple row and accept unused vertical space rather than creating an unsafe lift.
Store Dry Food Without a Forgotten Back Row
Keep shelf-stable groceries in a clean, cool and dry cabinet away from unusual heat or moisture. USDA guidance recommends inspecting packages for holes or moisture and following product storage directions. Use the FoodKeeper resource or manufacturer guidance when you need product-specific freshness information.
Arrange food so the oldest opened package is easiest to see and use. Put unopened backups together in one labeled reserve bin instead of hiding a duplicate behind every active product. Write the product name on an opaque bin and keep original date and storage information with the food.
Limit each bin to a category that is useful during one task: breakfast, snacks, baking ingredients or weeknight sides. Broad labels such as “food” create another junk zone. When a package is too tall or heavy for the bin, give it a visible direct-access position instead of forcing the lid or handle to bend.
Test the Retrieval and Return Path
Prepare one ordinary meal using the reorganized cabinet. Count how many unrelated items must move and notice whether a bin needs two hands or a riser blocks the lower row. Then return everything. Close the door, open it again and check whether labels, handles and open space remain visible. Repeat the test after one week; move any frequently used item that repeatedly returns to the wrong place. For a wider zoning reset, continue with our small kitchen storage plan for renters.
Frequently Asked Questions
What should go in deep kitchen cabinets?
Use deep lower cabinets for heavy cookware, mixing bowls, small appliances or grouped pantry supplies. Use deep upper cabinets for lighter items. Daily products belong near the opening, and anything stored farther back should move forward in a bin, tray, turntable or pull-out.
Are bins or pull-outs better for deep cabinets?
Bins are flexible, inexpensive and easy to move between cabinets. Pull-outs provide drawer-like access but require more exact width, depth, door and hinge clearance. Choose the simplest option that carries the loaded category comfortably through the real opening.
How do I organize deep cabinets without drilling?
Use handled bins, open trays, shelf risers, turntables, tension-supported dividers or freestanding pull-out frames. Confirm weight limits and removal instructions. Test the footprint with cardboard and add non-slip material only when it will not interfere with the organizer or cabinet surface.
Do turntables waste space in deep cabinets?
A round turntable leaves unused cabinet corners, but that tradeoff can be worthwhile when small bottles rotate into view. It is less efficient for large rectangular boxes or bags. Measure the largest item at the outside edge because that item determines the true rotation clearance.
How do I measure for a pull-out organizer?
Measure the narrowest door opening, interior width, usable depth, shelf or cabinet height, hinge projection and the open space in front. Compare those numbers with the organizer’s full frame and basket dimensions, not only the advertised cabinet size. Test the proposed footprint and removal path before ordering.
How should I organize a deep upper cabinet?
Keep light daily items on the lowest reachable shelf, use shallow handled bins for rear categories and place lightweight occasional supplies above. Label the bin edge facing you. Avoid heavy glass or any container that must be pulled toward your face while standing on tiptoe.
Make the Back of the Cabinet Come Forward
Successful deep kitchen cabinet organization begins with movement. Give daily items a clear front position, add a shelf level only when both levels remain usable, and require every rear group to slide, rotate or lift forward as one manageable unit.
Measure the opening and removal path before buying, test the layout with real items and leave enough space to return everything without rebuilding the cabinet. A simple bin or tray that works every day is more valuable than a high-capacity organizer that traps the back row.